 Spatial Mapping, Gaze, and Gestures
by Dr Fridolin Wild, Performance Augmentation Lab, Oxford Brookes University
Contents
- Part 1. Spatial Mapping - Prefabs and Configuration
- Part 2. Spatial Mapping - UI for room scans
- Part 3. Placement with the gaze pointer and air tap
- Part 4. Hover highlighting and tap interaction
The capability to map and understand the spatiality of the physical environment surrounding us of the new Smart Augmented Reality Glasses like the Microsoft HoloLens or the Magic Leap is a game changer. For the first time, this enables pervasive experiences with an optical quality that causes our perception to sometimes struggle to distinguish what is real and what not.
At the same time, this has triggered a paradigm change in Human Computer Interaction, with gaze pointers and gesture control replacing swipes & taps (and mouse pointing and clicking).
In this tutorial, we will be looking into how to set up these three functionalities: spatial mapping (aka “room scanning”), gaze navigation, and ‘click’ activation using air-tapping gestures.
The tutorial closes with configuration information on how to set up Unity3D, Visual Studio, and all the needed packages, modules, and SDKs. In theory, this tutorial in itself should enable you to get started from scratch and take you far enough to build your first “hello world” app - with the world being your own personal reality you created :).
Part 1. Spatial Mapping - Prefabs and Configuration
Clean up the game object Hierarchy and delete the camera and the directional light. We will replace these with the correct ones.
For this, import the HoloToolkit 2017.4.3.0 (see configuration section at the end of this tutorial): in the menu, call Assets > Import Package > Custom Package. Once all files are imported, you should see a new folder “HoloToolkit” in your Project file browser.
Search in the Project explorer now for HoloLensCamera and drag and drop this prefab into the game object Hierarchy.
Now create an empty game object (Create > Create empty) in the game object Hierarchy and rename it to HoloToolkit. This is to make sure we keep things nice and tidy and have no difficulty finding our game objects and scripts later.
Now search in the Project explorer for Spatial Mapping, then InputManager, also InteractiveMeshCursor, and SpatialUnderstanding. Add all four to the project Hierarchy. Your Hierarchy looks now like the one depicted to the left.
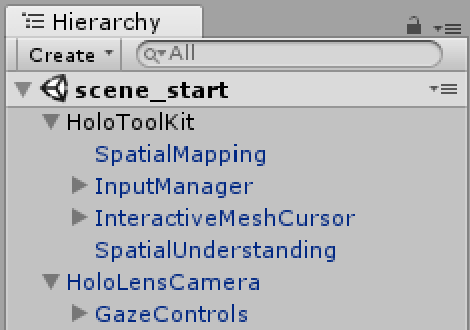
Let’s go through them.
We have replaced the standard camera with the HololensCamera - as every Unity project uses a camera to define how to render the scene.
The other prefabs we added support us in scanning the room (and - potentially - cleaning up the meshes scanned with the Spatial Understanding).
They help with the gaze and gesture interaction (InputManager).
And a cursor was selected to visualize where (and what) the gaze cursor (a kind of ‘3D mouse pointer’) rests upon in the environment.
We select the Spatial Mapping game object and look at the Inspector to set the number of Triangles Per Cubic meter to 100 only (this will give us less precise meshes, but they will be much faster).
Make sure that the Physics Layer is 31, and that the Surface Material is set to Wireframe (there are cool shaders available to pimp this visually).
Deactivate the Auto Start Observer - we will build our own user interface (UI) for starting and stopping the scan.
Do the same with the Spatial Understanding: deactivate the option Auto Begin Scanning.
Shortcut: If you just want the Spatial Mapping to anchor your game objects, you can leave the Auto Start Observer and Auto Begin Scanning on and ignore the next section on how to build a UI for scanning rooms.

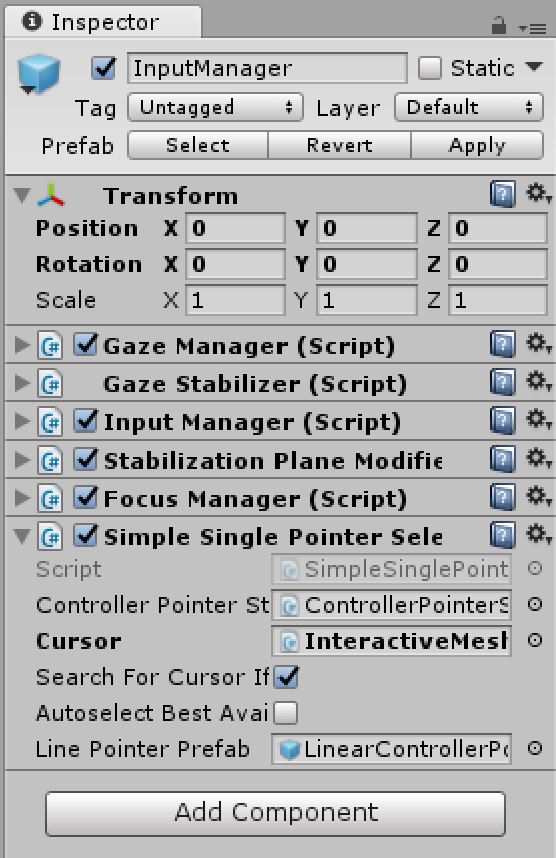
For the InputManager, there is not much we need to configure.
Just make sure to drag and drop the InteractiveMeshCursor from the Hierarchy onto the slot “Cursor”.
Part 2. Spatial Mapping - UI for room scans
Next, we start building up our own user interface. Unity uses a Canvas game object to hold the elements of the user interface together. So the first thing we do is to create game object UI > Canvas and rename it to “SpatialMappingCtrlMenu”.

The scale of 1 is rather big for the small display of the HoloLens, so we set x/y/z scale to 0.3.
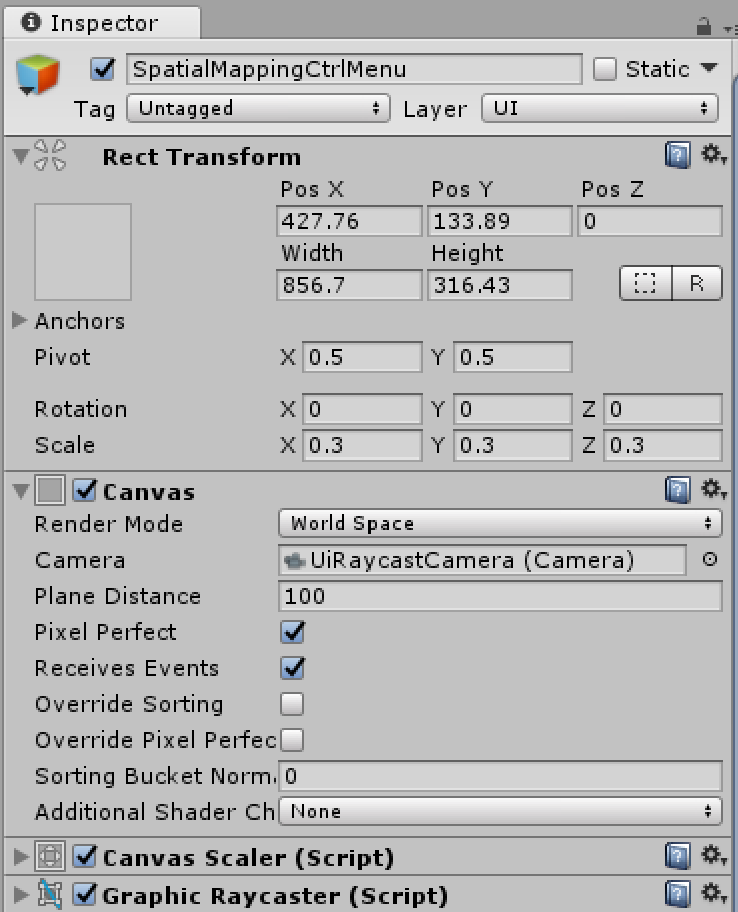
There are different ways of rendering the UI, but for here, we need to set the Canvas to render to World Space (this will also trigger automatically to pick a different Camera in the sub settings for rendering it).
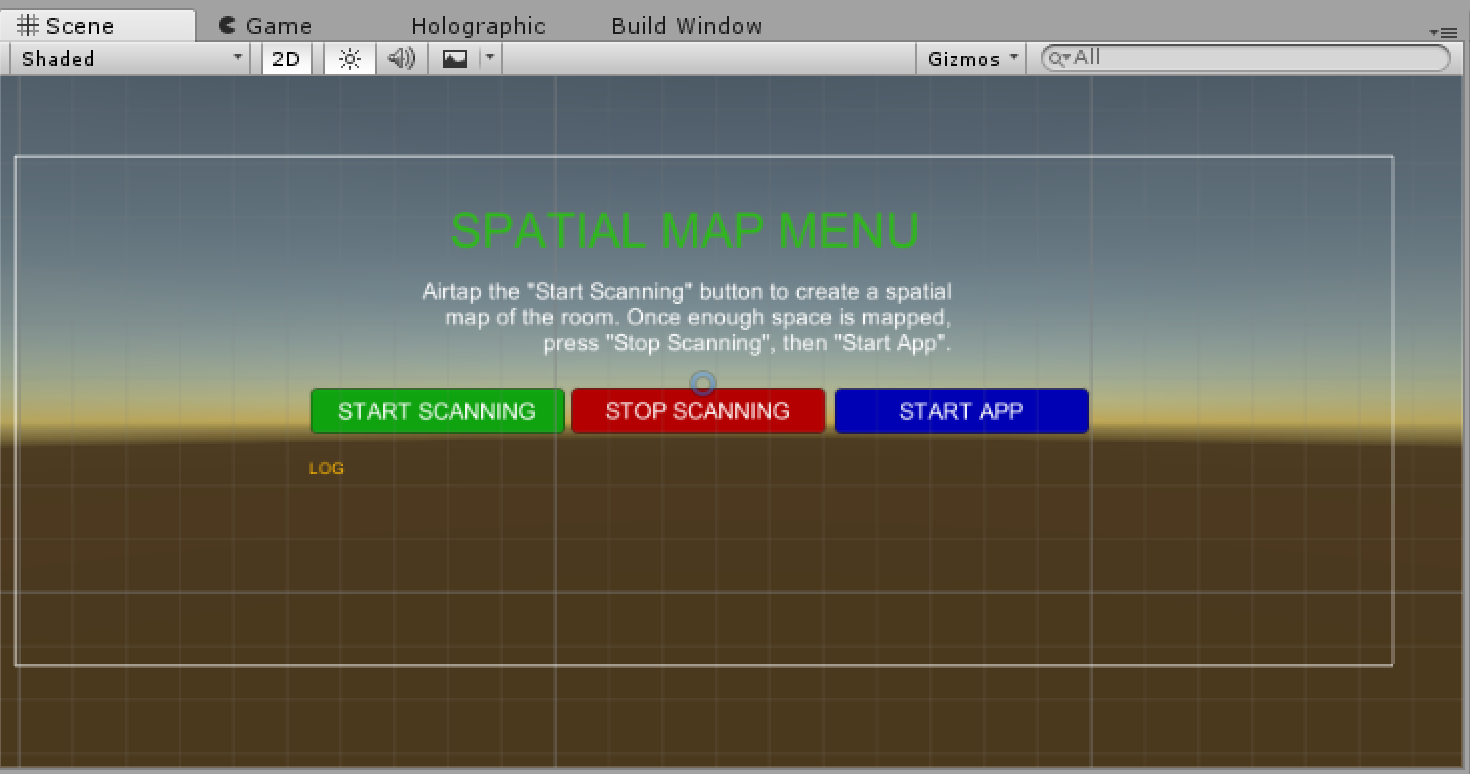
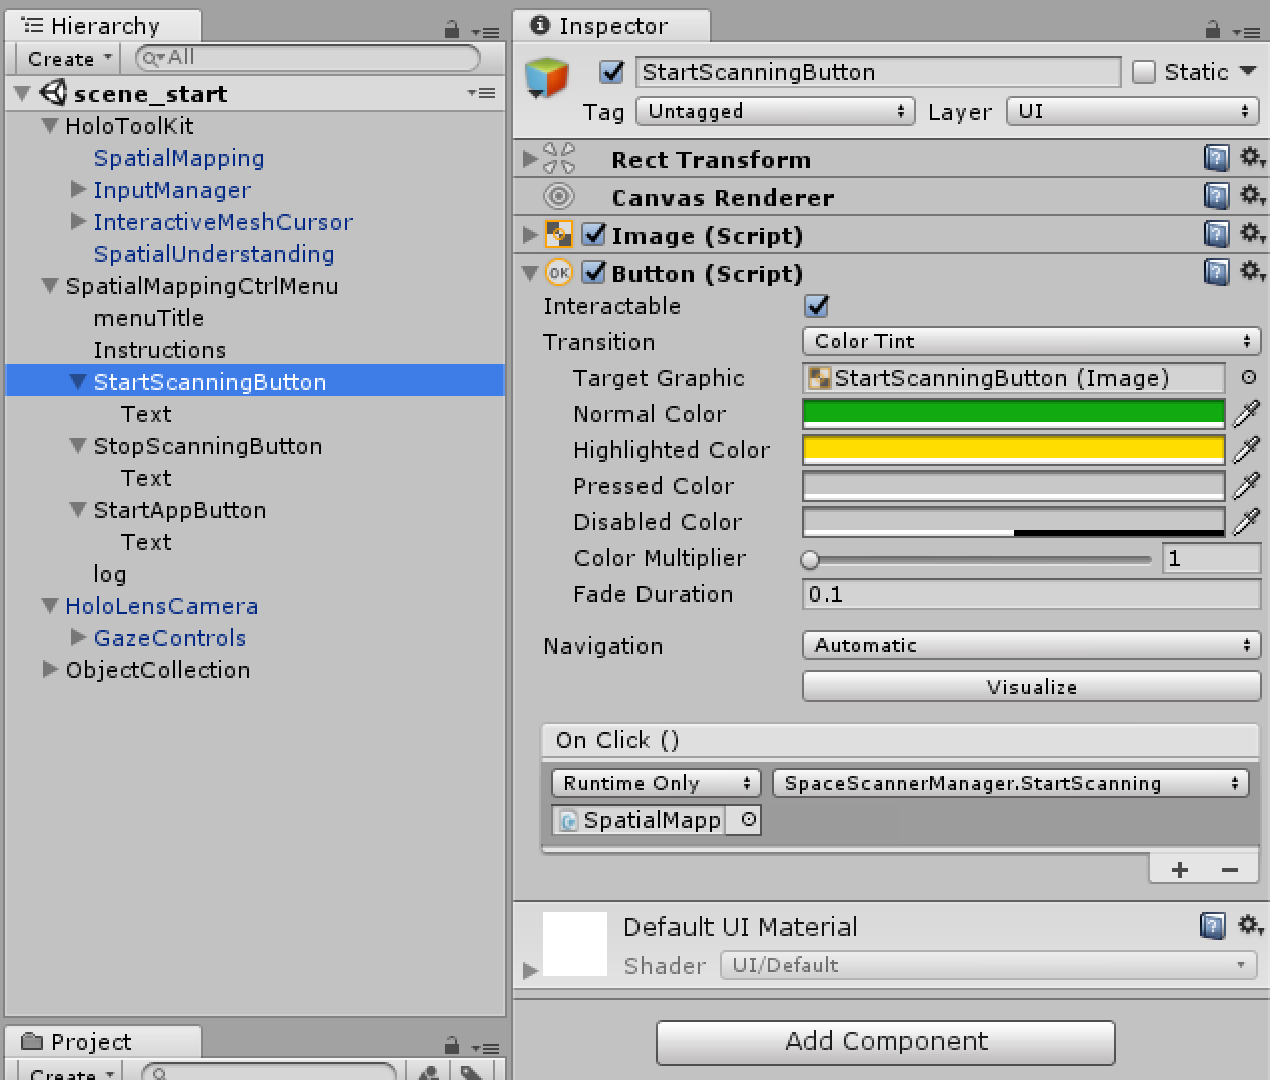
Next, we create three UI > Text game objects and three UI > Button objects. We rename the text objects to “menuTitle”, “Instructions”, and “log”.
The buttons are renamed to “StartScanningButton”, “StopScanningButton”, “StartAppButton”.
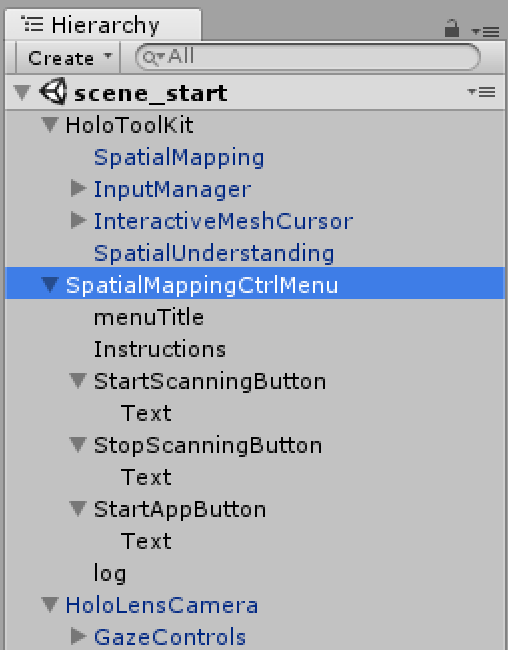
We rearrange the elements in the scene preview by switching to 2D in the Scene and double-clicking the “SpatialMappingCtrlMenu” canvas in the Hierarchy. Arrange them to something like this:
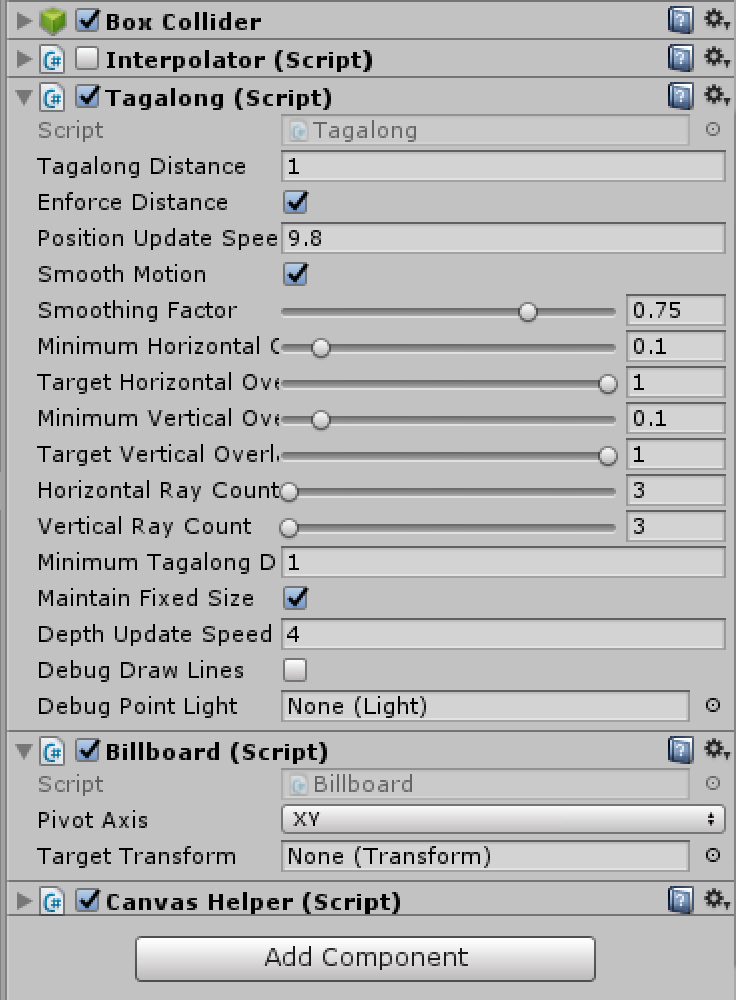
The menu canvas needs to face always to the user (‘billboard’) and follow the user around (‘tag-along’), so we search for the HoloToolkit Tagalong and Billboard scripts and attach them to the canvas.
We now import the tutorial unity package (“itss tutorial 1.unitypackage”).
Once imported, we add the SpaceScannerManager script (folder “_scripts”) and attach it to the menu canvas.
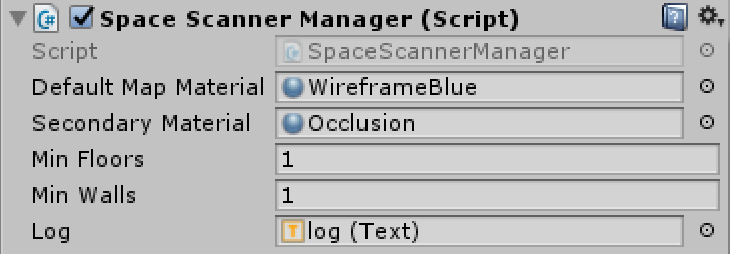
The SpaceScannerManager has several configuration settings.
We add two mesh map materials (search for “WireframeBlue” and “Occlusion” and add them accordingly).
Moreover, we drag and drop the Text game object log onto the Log slot.
This allows the SpaceScannerManager script to output log messages onto the area we have foreseen for debug output on the menu canvas.
To fully function, we have to add two more HoloToolkit scripts, SurfaceMeshesToPlanes and RemoveSurfaceVertices.
We attach them to the menu canvas as well.
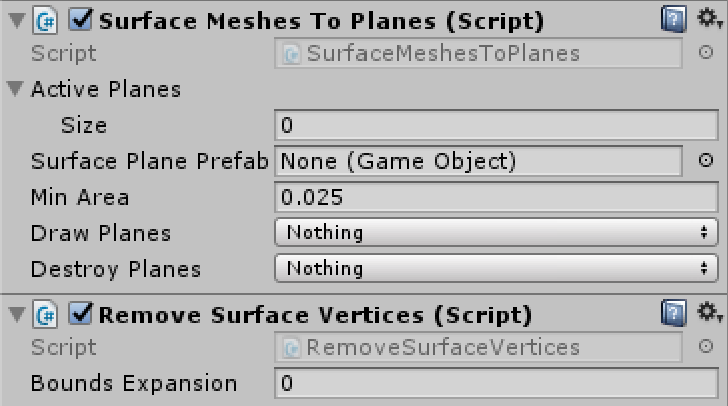
We select for Draw Planes and Destroy Planes the option Nothing each.
The SurfaceMeshesToPlanes script is responsible for identifying plane surfaces from the raw mesh, detecting floor, walls, tables, and the like.
It is possible to replace the raw mesh with these identified surfaces, but we don’t want that, as it makes the preview flicker during the scanning.
The RemoveSurfaceVertices is responsible for thinning out the mesh, where possible.
The SpaceScannerManager script takes care of all this.
It communicates with the Spatial Mapping to start and stop the observer responsible for scanning the room mesh, cleaning the mesh once scanned, and checking whether enough surfaces have been scanned (satisfying the min floors and min walls requirements set).
Moreover, it provides three methods for the buttons to control: StartScanning(), StopScanning(), and StartApp().
The way the SpaceScannerManager class works is: StartScanning() activates the spatial mapping by starting the according Spatial Mapping observer, setting the scanning flag to true (thus calling the planes extraction method in Update() in every frame), and registering a callback to MeshToPlanes() for every time the planes extraction concludes:
public void StartScanning()
{
	enoughSpace = false;
	scanning = true;
	SpatialMappingManager.Instance.SetSurfaceMaterial(defaultMapMaterial);
	SurfaceMeshesToPlanes.Instance.MakePlanesComplete += MeshToPlanes;
	SpatialMappingManager.Instance.StartObserver();
}

// Update is called once per frame
void Update ()
{
	if (scanning)
	{
		CreatePlanes(); // convert raw mesh to planes
	} // if scanning
} // Update()

private void MeshToPlanes(object source, System.EventArgs args)
{

	// get floor/table planes
	horizontal = SurfaceMeshesToPlanes.Instance.GetActivePlanes(PlaneTypes.Table | PlaneTypes.Floor);

	// get wall planes
	vertical = SurfaceMeshesToPlanes.Instance.GetActivePlanes(PlaneTypes.Wall);

	if (horizontal.Count >= minFloors && vertical.Count >= minWalls)
	{
		// We have enoughSpace floors and walls to place our holograms on...
		enoughSpace = true;
	}
	else
	{
		// We do not have enoughSpace floors/walls to place our holograms on...
		enoughSpace = false;
	}
}

private void CreatePlanes()
{
	SurfaceMeshesToPlanes surfaceToPlanes = SurfaceMeshesToPlanes.Instance;
	if (surfaceToPlanes != null && surfaceToPlanes.enabled)
	{
		surfaceToPlanes.MakePlanes();
	}
}
StopScanning() then stops the Spatial Mapping Observer.
Afterwards, the raw mesh is cleaned up by removing triangles (a call to RemoveTriangles).
Finally, StartApp() calls the PopulateSpace singleton’s InstallObjects() method, but only if the space requirements are satisfied (minimum number of floors and minimum number of walls).
These three key methods need to be registered with the On Click() events of the corresponding UI button.
For this, we add (+) an On Click() event to the button and drag and drop the menu canvas game object onto the game object slot.
Then we can select SpaceScannerManager > StartScanning as the method to call when the button is clicked.
We apply the according method calls for StopScanning and StartApp analogously to the other two buttons.
Part 3. Placement with the gaze pointer and air tap
The error message we see in the console is telling us that the call to the singleton PopulateSpace is not (yet) working.
No surprise, we haven’t added it yet.
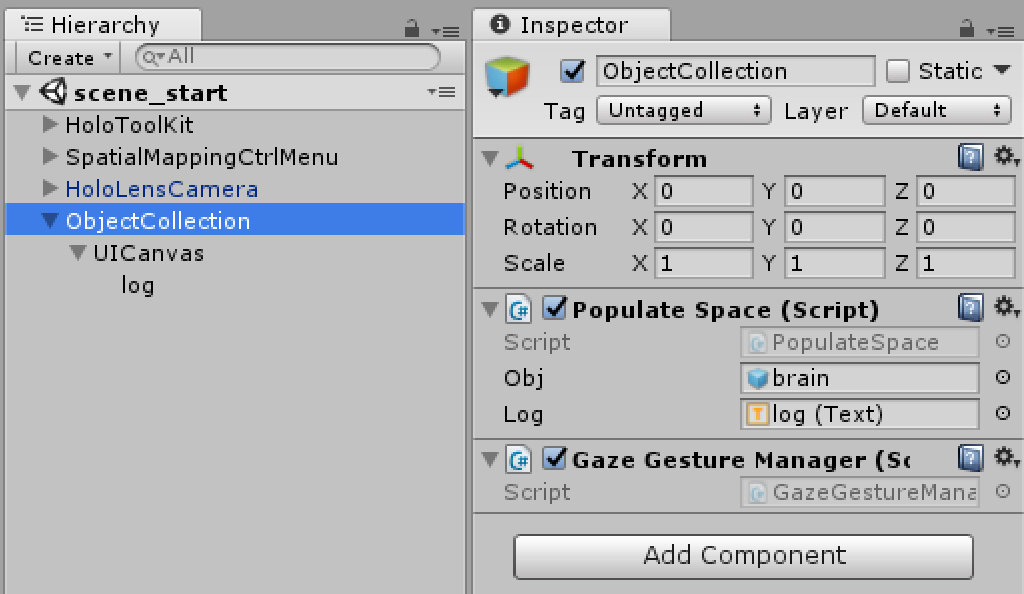
We first create a new empty game object and rename it to “ObjectCollection”.
Moreover, we add as a child another canvas, into which we place another Text game object.
The canvas gets renamed to “UICanvas” and the Text to “log”.
For the canvas, again, we set the Render Mode to World Space, and we add a Billboard and Tagalong script.
We attach two scripts PopulateSpace and GazeGestureManager (from “_scripts”) to the empty game object ObjectCollection.
For PopulateSpace we drag and drop the log Text game object from the “UIcanvas” onto the “Log” slot in the Inspector.
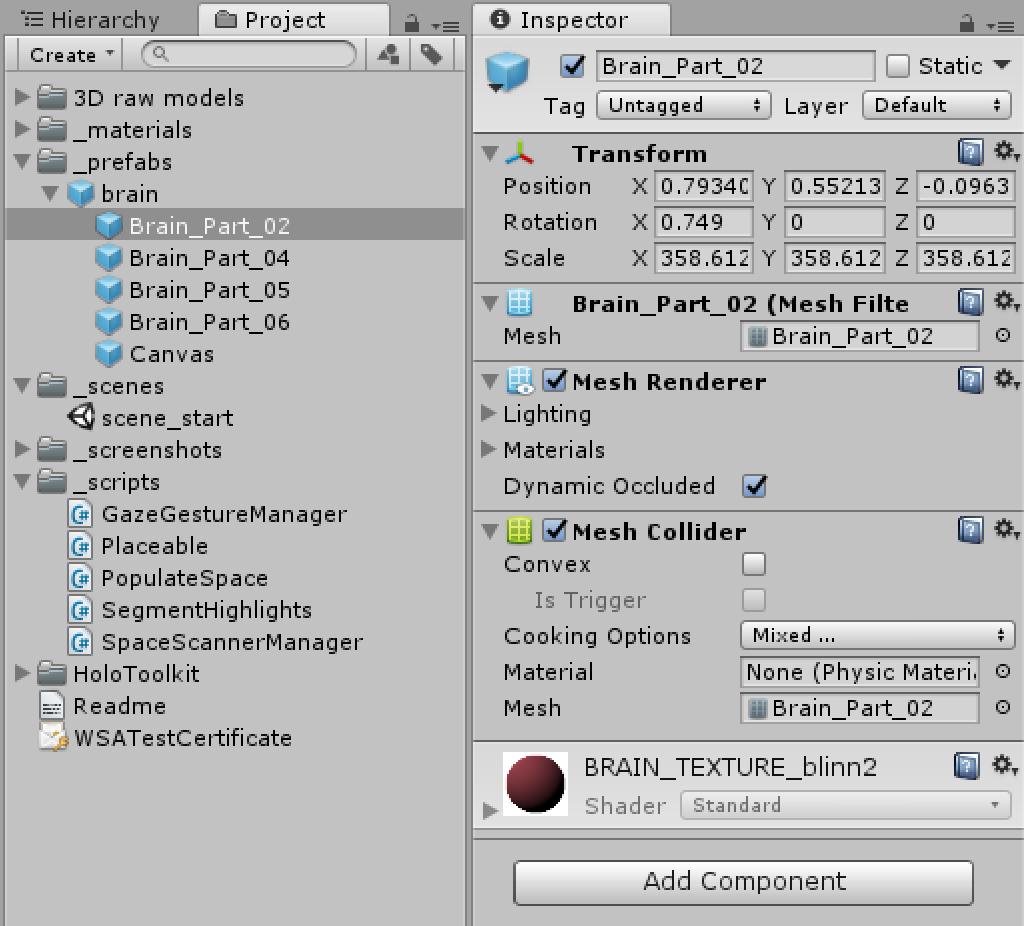
We have prepared a 3D model prefab, “brain”, which has the Placeable script already attached.
The Placeable script contains the code needed for conveniently displaying through the use of coloured bounding boxes and shadows, where the user can actually place an object.
Once a suitable location is found, the user simply airtaps to drop the object.
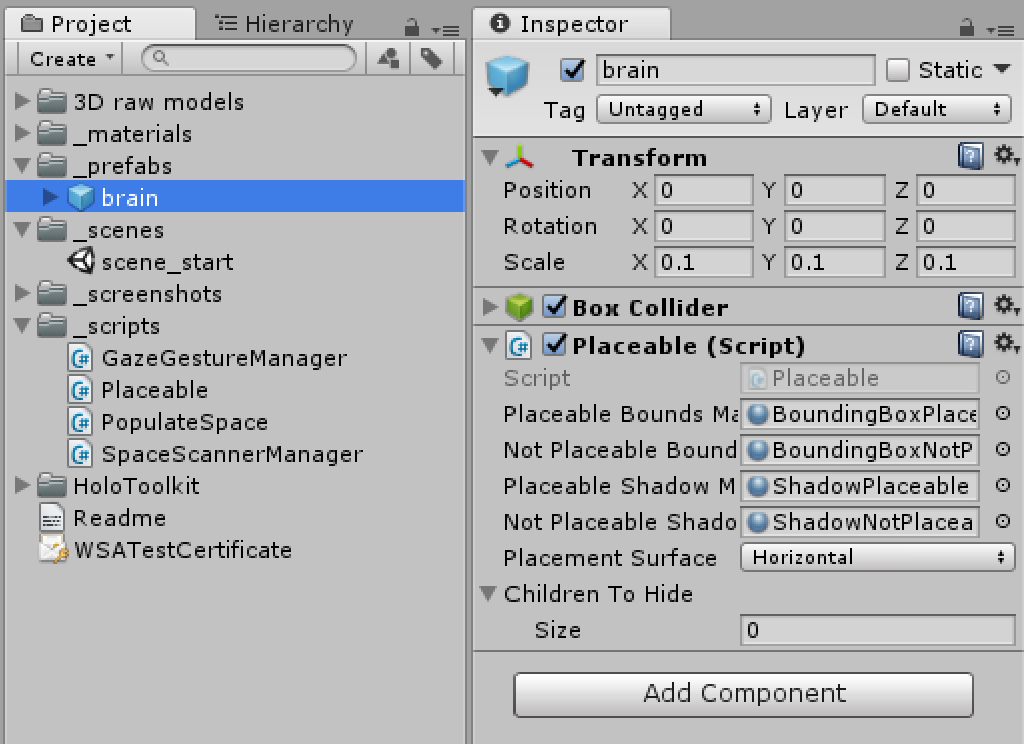
To connect the brain model prefab with the ObjectCollection, the other configuration slot, “Obj”, gets filled with the brain prefab (folder “_prefabs”).
public void InstallObjects()
{

	GameObject.Find("SpatialMappingCtrlMenu").SetActive(false); // hide menu
	SpatialMappingManager.Instance.DrawVisualMeshes = false; // hide map mesh

	GameObject currObj = Instantiate(Obj);
	currObj.transform.localScale *= 0.5f;
	currObj.GetComponent<Placeable>().OnSelect(); // activate placement mode
}
This will, once the scanning finished and StartApp() was triggered, execute the InstallObjects() method in the PopulateSpace singleton - there then instantiating a copy of the brain prefab into the scene and triggering its OnSelect method for convenient placement in the environment (on horizontal surfaces only!).
Part 4. Hover highlighting and tap interaction
The Placeable behaviour allows to repeatedly pick up the object with an air tap and drop it off at any location desired.
While this is great for populating the exhibition space, it also prevents us from interacting with the object placed.
To be able to stop the Placeable component script, we therefore first add a ‘EXPLORE BRAIN’ button to the brain prefab, wrapped into a canvas with World Space rendering.
(We drag and drop the prefab from the Project file explorer into the scene, modify it, and then drag it back to the Project file explorer to replace the prefab with the modified one).
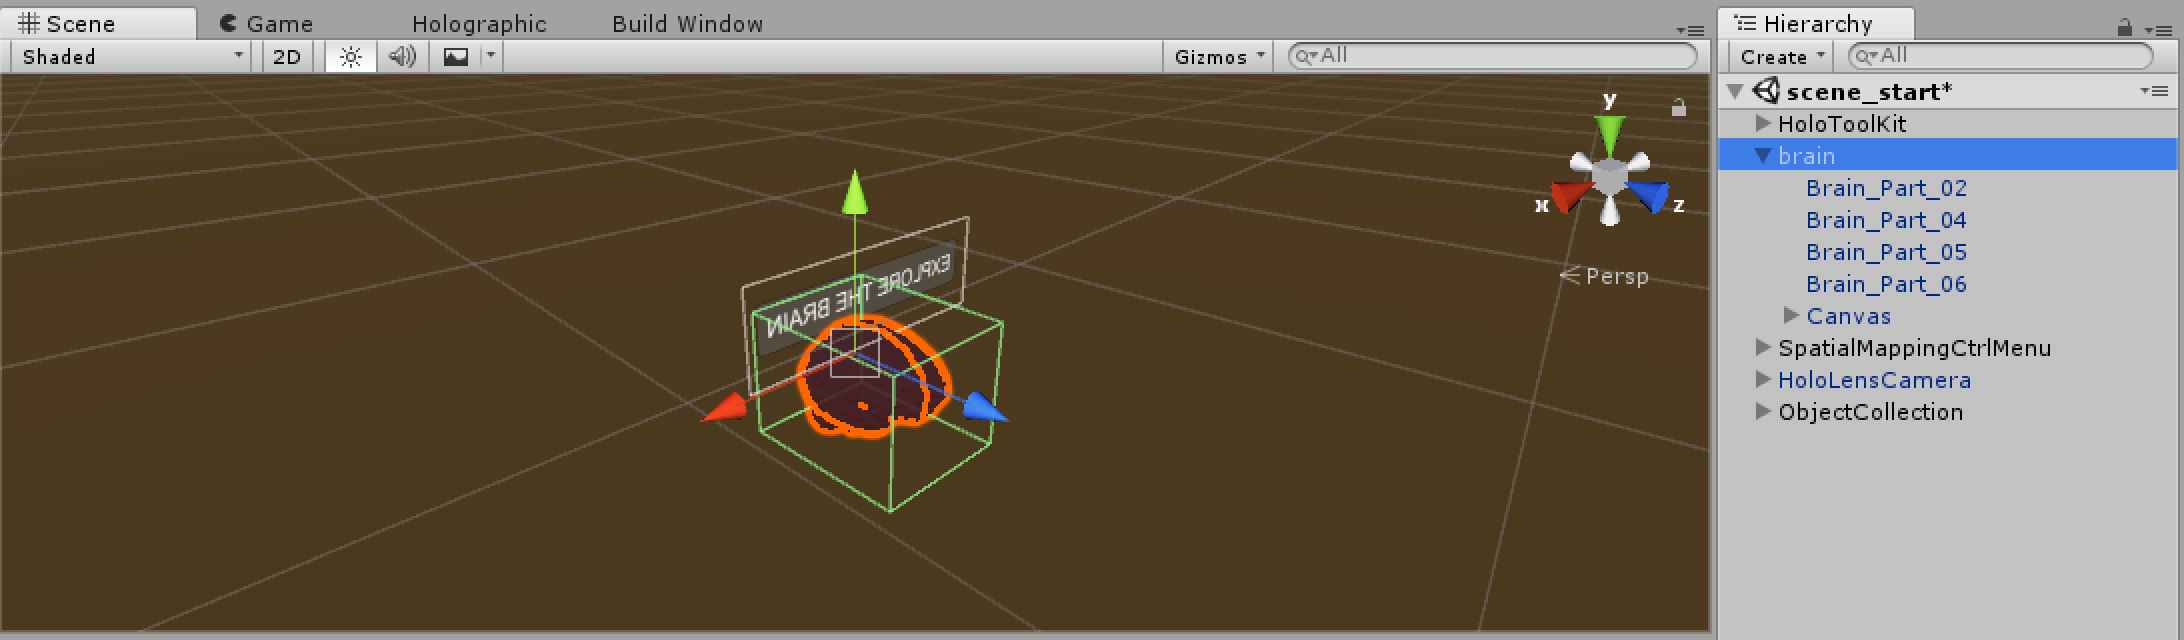
Our prefab in the Project explorer now shows that it also has a Canvas (which contains the Button). The canvas needs to be resized and properly positioned so that the button floats slightly over the brain model (see picture).
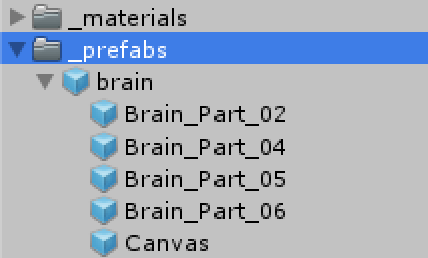
While we are at it, we also add Mesh Colliders (click “Add Component” and search for it) to each of the brain segments.
We will need those later so that they can be hit targets in the interaction.
The Mesh Colliders will automatically be fitted to the shape of the brain segment.
Since the button is on the prefab, we need to add an event listener for the On Click() event, otherwise nothing will happen upon air tapping the button.
We therefore modify the InstallObjects() method of the Object Collection game object.
We find the button object via its name, and then add the according event listener (linking against the new PopulateSpace.ExploreBrain() method shown below).
public void InstallObjects()
{

	GameObject.Find("SpatialMappingCtrlMenu").SetActive(false); // hide Space Scan Ctrl Menu
	SpatialMappingManager.Instance.DrawVisualMeshes = false; // hide Spatial Map Mesh

	currObj = Instantiate(Obj);
	currObj.transform.localScale *= 0.5f;
	currObj.GetComponent<Placeable>().OnSelect(); // activate placement mode

	Button b = GameObject.Find("ExploreBrainButton").GetComponent<Button>();
	b.onClick.AddListener(ExploreBrain); // register onClick event with the Button

	log.text += "Placing object " + Obj.name + "...\n";

} // InstallObjects()
This ExploreBrain() method first removes the “Explore brain” button – it is not needed anymore once activated.
Then it removes the Placeable script, which otherwise would capture all air tapping events (and keep moving the brain around).
Most importantly, the method also removes the Box Collider around the brain, so that the gaze cursor can now penetrate through and rest on the brain segments.
public void ExploreBrain()
{
	// remove the button
	GameObject.Find("ExploreBrainButton").SetActive(false);

	// remove drag & drop placeable script, as otherwise
	// it will interfere with the interaction with the brain segments
	Destroy(currObj.GetComponent<Placeable>());

	// remove Box collider, so that gaze cursor passes to child segments
	Destroy(currObj.GetComponent<BoxCollider>());

	// attach the interaction script to the brain prefab, so that segments can be clicked
	currObj.AddComponent<SegmentHighlights>();

}
Finally, a script to highlight the segments (SegmentHighlights) is added by code.
Let us look into this highlighter script.
First, the script installs a listener for the gesture recogniser and registers a callback for whenever the air tap gesture has been detected (linking to method On-Tapped()).
void Start()
{

	recogniser = new GestureRecognizer();
	recogniser.SetRecognizableGestures(GestureSettings.Tap);
	recogniser.Tapped += onTapped;
	recogniser.StartCapturingGestures();

}
The onTapped method then uses the standard method to find out what actually has been tapped: cast a ray from the camera position of the head worn camera and then investigate whether this ray actually hit anything (and whether that anything is a game object).
public void onTapped(TappedEventArgs args)
{
var headPosition = args.headPose.position;
var gazeDirection = args.headPose.forward;
RaycastHit hitInfo;
if (Physics.Raycast(headPosition, gazeDirection, out hitInfo, 10.0f, Physics.DefaultRaycastLayers))
{
// If the raycast hit a hologram, use that as the focused object.
FocusedObject = hitInfo.collider.gameObject;
string[] segs = { "Brain_Part_02", "Brain_Part_04", "Brain_Part_05", "Brain_Part_06" };
if (segs.Any(FocusedObject.name.Equals))
{
if (FocusedObject.name == "Brain_Part_04")
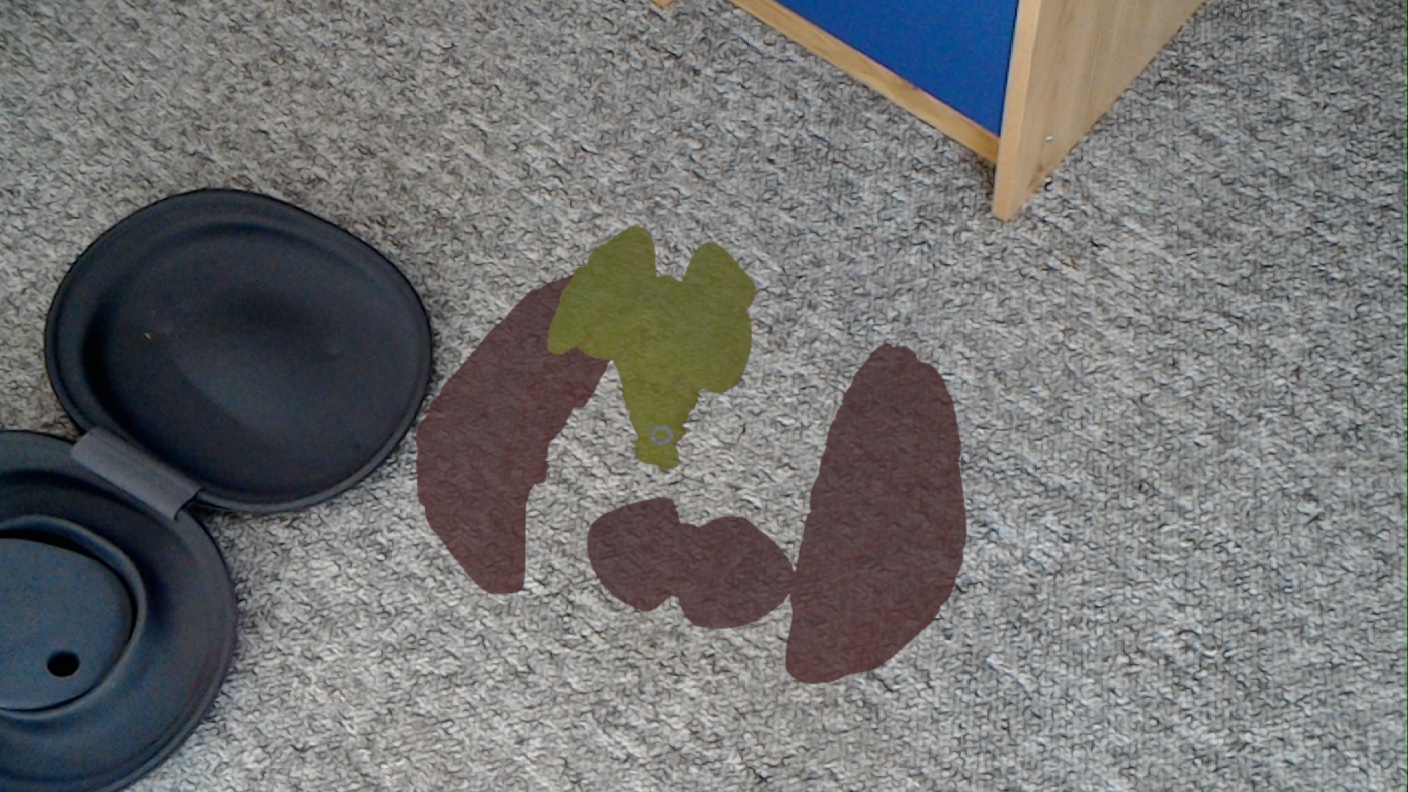
{
FocusedObject.transform.Translate(Vector3.forward * 0.1f, Space.World);
} else if (FocusedObject.name == "Brain_Part_06")
{
FocusedObject.transform.Translate(Vector3.back * 0.1f, Space.World);
} else if (FocusedObject.name == "Brain_Part_02")
{
FocusedObject.transform.Translate(Vector3.up * 0.5f, Space.World);
} else if (FocusedObject.name == "Brain_Part_05")
{
FocusedObject.transform.Translate(Vector3.up * 0.2f, Space.World);
}
}
}
else
{
// If the raycast did not hit a hologram, clear the focused object.
FocusedObject = null;
}
}
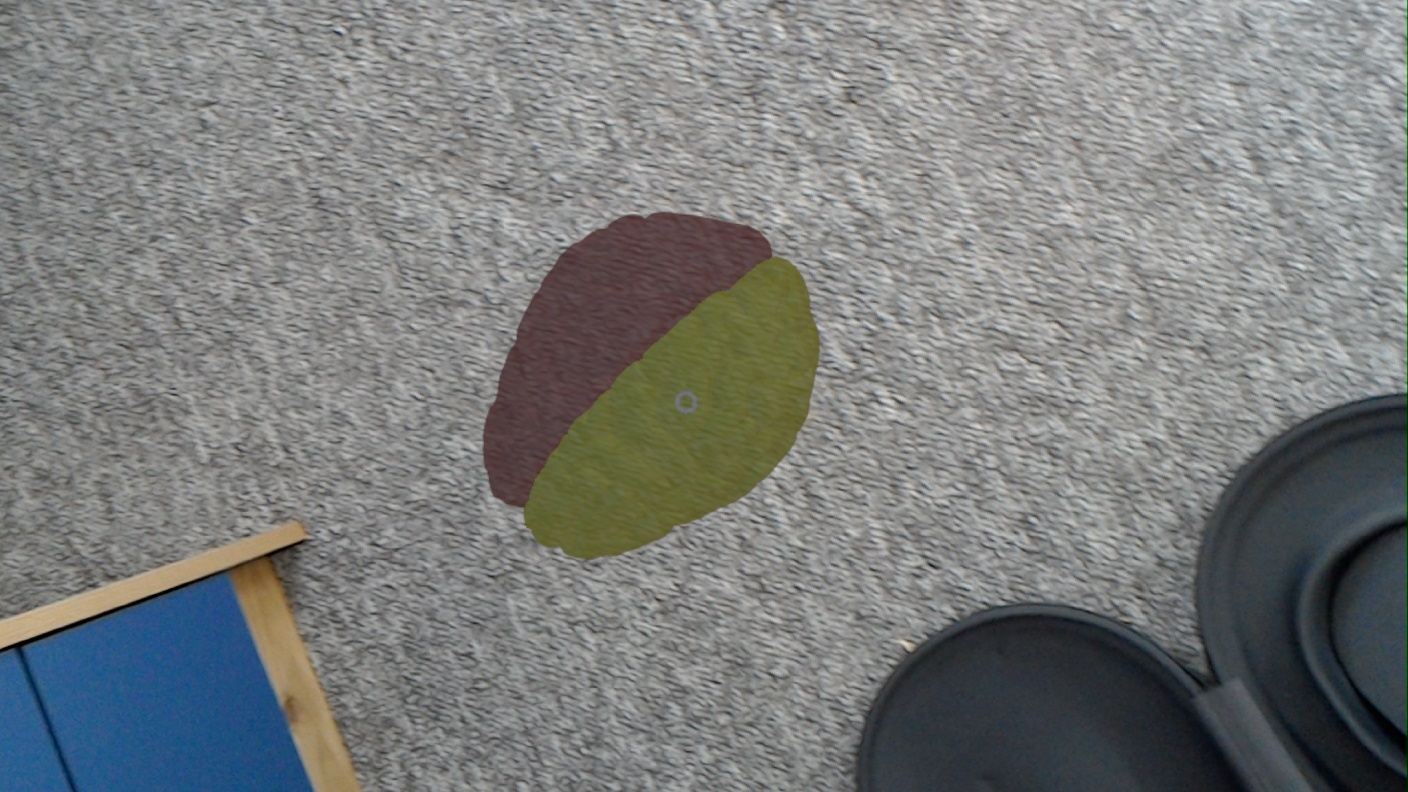
If it has hit a game object, we can check whether the name is any of the names of the brain segments, and react accordingly by moving the segment into a predefined direction (left half goes back, right half goes forward, stem up, etc.)
Moreover, we can add a method for handling the highlighting to the Update routine of the class.
void Update()
{
	HoverHandler();
}

void HoverHandler ()
{

	GameObject oldFocusObject = FocusedObject;

	var headPosition = Camera.main.transform.position;
	var gazeDirection = Camera.main.transform.forward;
	RaycastHit hitInfo;
	if (Physics.Raycast(headPosition, gazeDirection, out hitInfo))
	{
		// If the raycast hit a hologram, use that as the focused object.
		FocusedObject = hitInfo.collider.gameObject;
	}
	else
	{
		// If the raycast did not hit a hologram, clear the focused object.
		FocusedObject = null;
	}

	// If the focused object changed this frame, add/remove highlight colour
	if (FocusedObject != oldFocusObject)
	{
		string[] segs = { "Brain_Part_02", "Brain_Part_04", "Brain_Part_05", "Brain_Part_06" };

		if (oldFocusObject != null && segs.Any(oldFocusObject.name.Equals))
		{
			RemoveHighlightFromSegment(oldFocusObject);
		}
		if (FocusedObject != null && segs.Any(FocusedObject.name.Equals))
		{
		HighlightSegment(FocusedObject);
		}
	}
}
Again, the HoverHandler uses a ray cast to find out whether something (and what) has been hit by the ray cast from the position and orientation of the head-worn camera.
If it is a brain segment, and if this has not already been hit previously (in previous frames of the update loop), then the highlight and remove highlight routines will be called.
public void HighlightSegment(GameObject Segment)
{
	OldColour = Segment.GetComponent<Renderer>().material.color;
	Segment.GetComponent<Renderer>().material.color = Color.yellow;
}

public void RemoveHighlightFromSegment(GameObject Segment)
{
	Segment.GetComponent<Renderer>().material.color = OldColour;
}
Those routines simply remember the colour in use of the brain segment (they all have the same colour, so no need to memorise more than one), and it replaces it with yellow for the highlight.
 Note
Note
The 3D brain model is from https://free3d.com/3d-model/brain-18357.html and free for personal use. The
PlaceableandGazeGestureManagerbehaviour scripts are from the Microsoft Holoacademy Spatial Mapping tutorial.