 Dialogue Understanding
Contents
- Part 1. Creating an IBM Cloud account
- Part 2. Creating a Watson Assistant
- Part 3. Creating a Chatbot
- Part 4. Unity settings
- Part 5. Using Watson in Unity3D
Resources
- Download Unity project https://github.com/Yu713/IBMDiaTraining
Software
- Unity 3D (version 2018.3.14f1)
Part 1. Creating an IBM Cloud account
Step 1.1: Register an account https://cloud.ibm.com/login > create an IBM Cloud account > you’ll be asked to verify your email > complete personal information > login your account and accept the privacy notices.
 Note
Note
If you already have a Watson Assistant service running in your IBM Cloud account, and you can jump to the next part.
Part 2. Creating a Watson Assistant
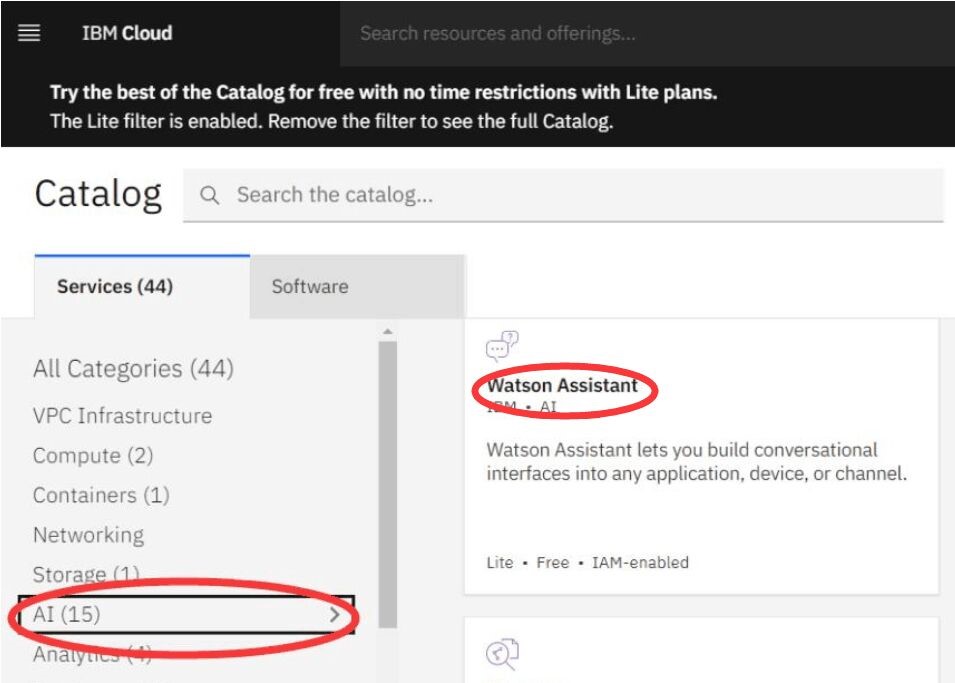
Step 2.1. Click on the Create resource button on the dashboard > Watson Assistant (if you can’t find it, Catalog > AI > Watson Assistant) > Click Create tab, and check the region.
Step2.3. Launch Watson Assistant > Create assistant, called “AI training” (or something else you like) > Create assistant > Add dialog skill > Select Create skill > Dessert > Create dialog skill > click on “Dessert”.
Step 2.4. Create Speech to Text & Text to Speech: Go back to the Dashboard > Add services > Catalog > Services > Select “AI” > Click on Speech to Text & Text to Speech > Create. (they will be used in Unity)
Part 3. Creating a Chatbot
In this tutorial, we will create a simple Chatbot that can be used in your 3D character model in Unity 3D.
Before that, let’s take example. If you call a dessert shop, what a seller will ask you questions? You may say hi, I’d like to order a chocolate cake, and the seller needs to know your name and phone number. So the dialogue will be like that:
| 1. Seller | Welcome to XXX shop, what can I do for you? |
|---|---|
| 2. User | I’d like to order some desserts/cakes |
| 3. Seller | How can I call you?/ What’s your name? |
| 4. User | my name is XXXX |
| 5. Seller | What desserts do you like? do you need a menu? Today, we have specials. |
| A user needs to make a choice. 1. The user directly orders a dessert; 2. He/she needs a menu. 3. The seller gives some recommendations (specials) | |
| User | I’d like to order XXXXXX |
| 6. Seller | What’s your phone number? |
| 7. User | It’s 1234567890 |
| 8. Seller | Thanks, we’ll send a message to you. |
Step 3.1- 3.10 introduces how to create the No.1-4 of the table; Step 3.11- 3.15 shows No.5; No.6-7 is on the Step 3.17-3.19.
Note
· Intents: the purpose of a user’s input. The Watson assistant can select the correct dialogue flow by recognizing the intents.
· Entities: it shows information in the user input that is relevant to the user’s purpose.
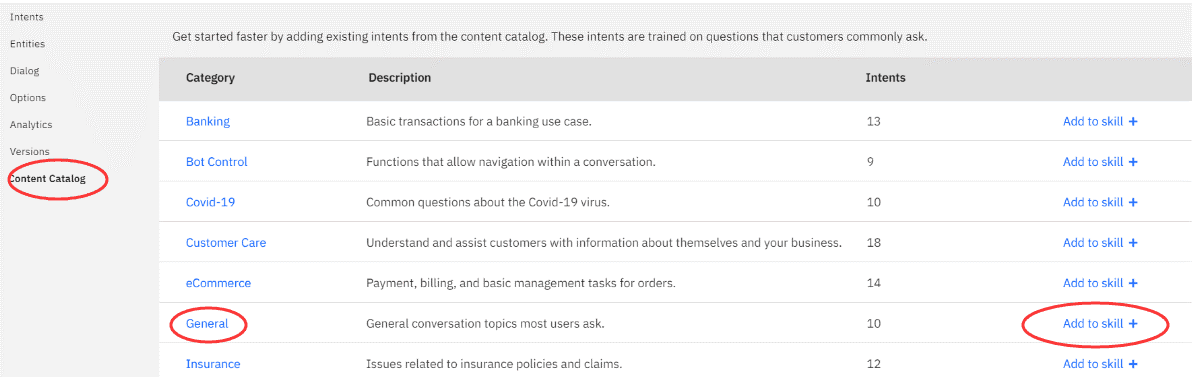
Step 3.1. Click on Content Catalog > General can be added to skill (it includes lots of basic contents of conversation, like good morning. But in this tutorial, we are not going to use it)
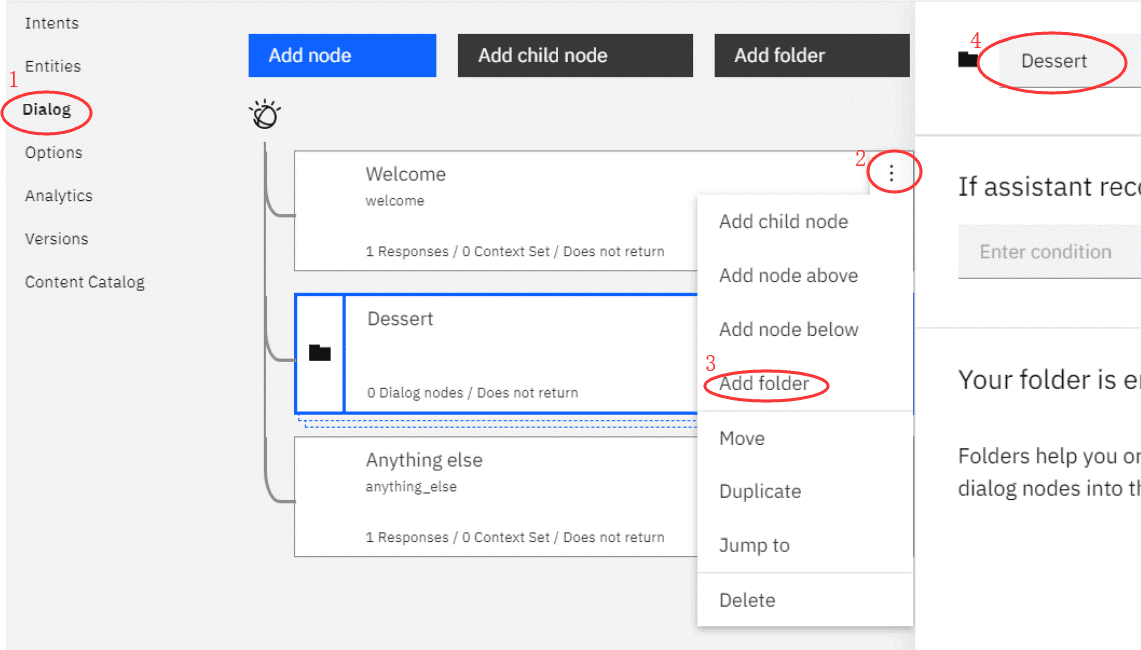
Step 3.2. Select Dialog > Click on the Node options on the Welcome node > Add folder > named “Dessert”.
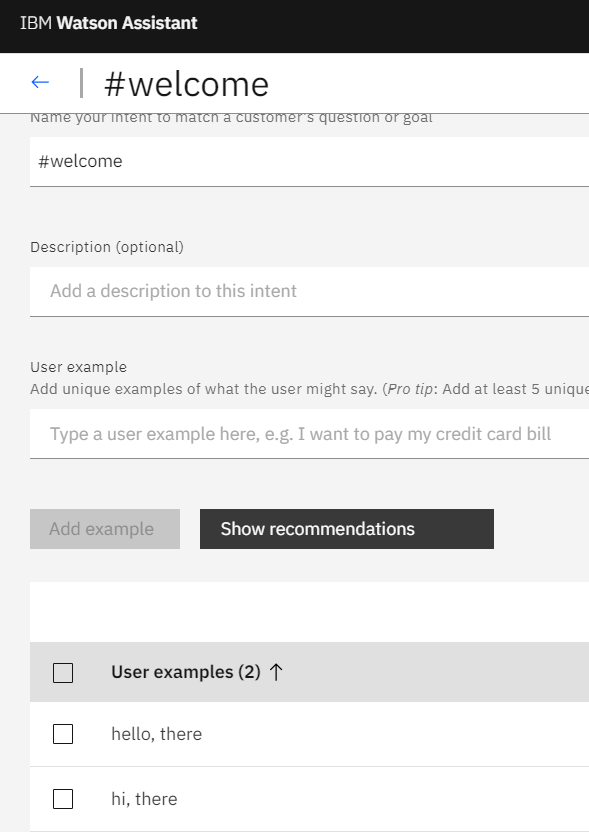
Step 3.3. Click on Intents > Create Intent, called “#welcome” > Create > user example is Hi/hi, there; Hello/hello, there.
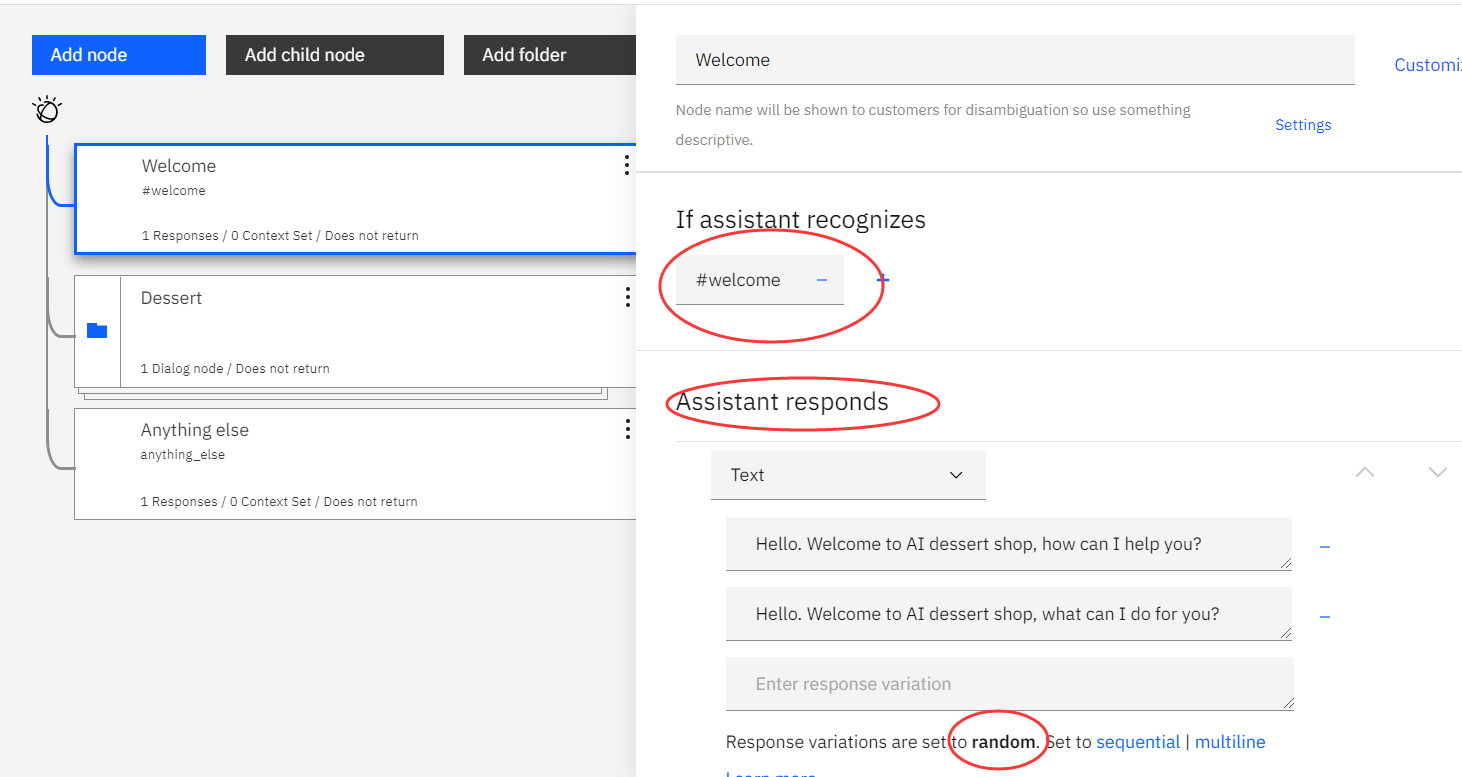
Step 3.4. Go back to Dialog > Click on Welcome node > Condition (If assistant recognizes) is #welcome > Customize the Welcome node prompt with (Assistant responds):
Hello, Welcome to AI dessert shop. How can I help you?
Hello, Welcome to AI dessert shop. What can I do for you? > Response variations are set to random.
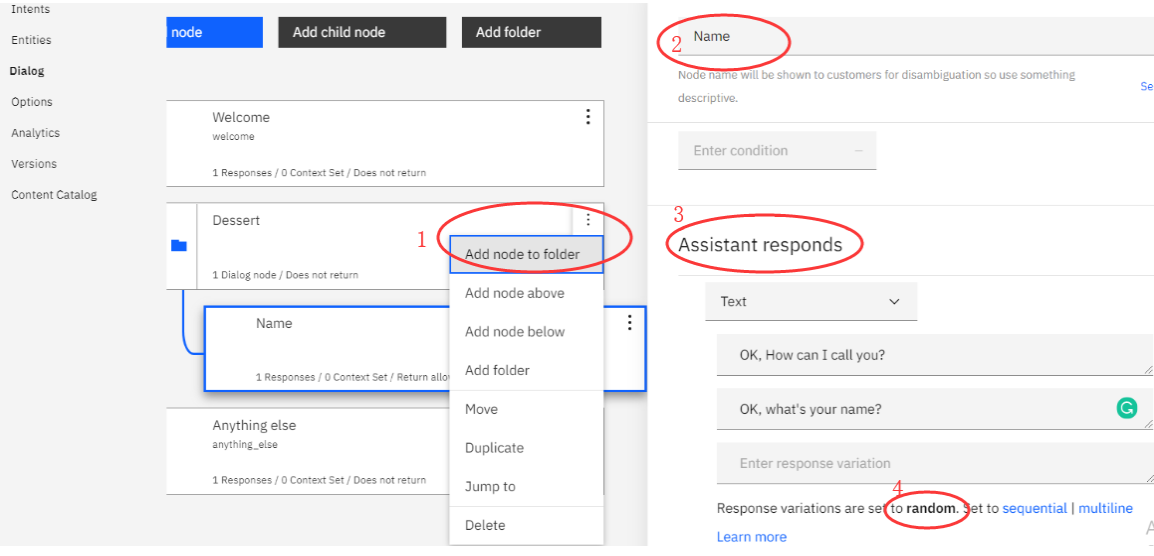
Step 3.5. Click on Node options on the Dessert folder > add node to folder, called “Name” > Assistant responds: OK, how can I call you? / what’s your name? > Response variations are set to random again.
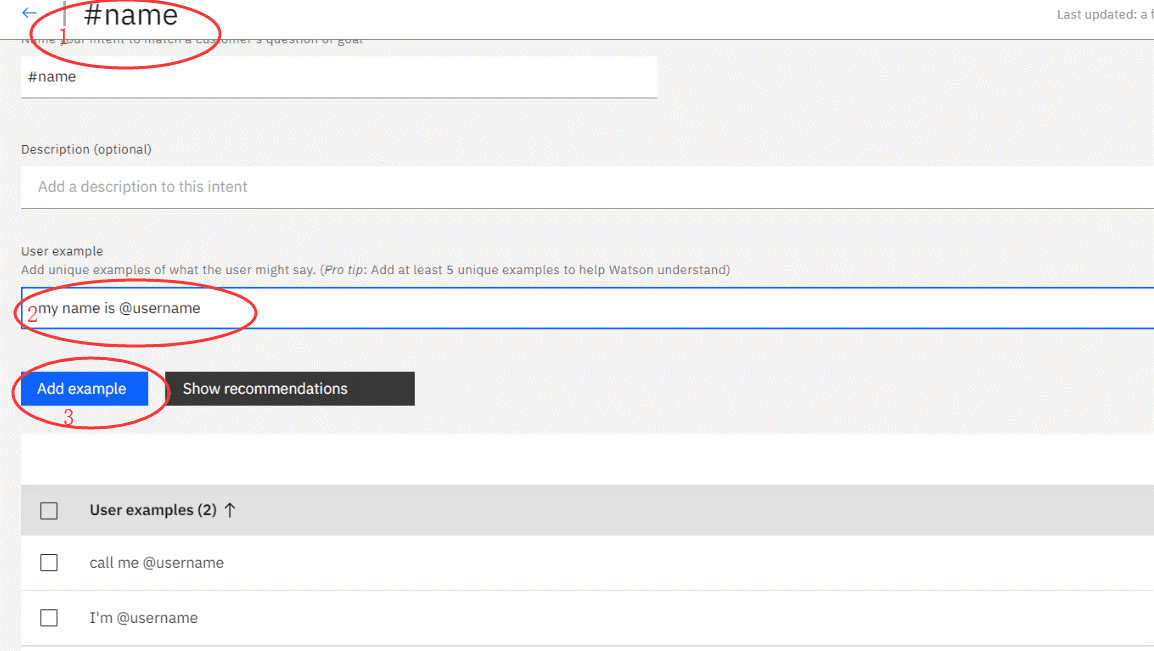
Step 3.6. Click on Intents > Create Intent > create a #name > add example:
I’m @username.
call me @username.
my name is @username.
Note
The first alphabet should be lowercase, if it’s capital, the assistant cannot recognize user’s name.*
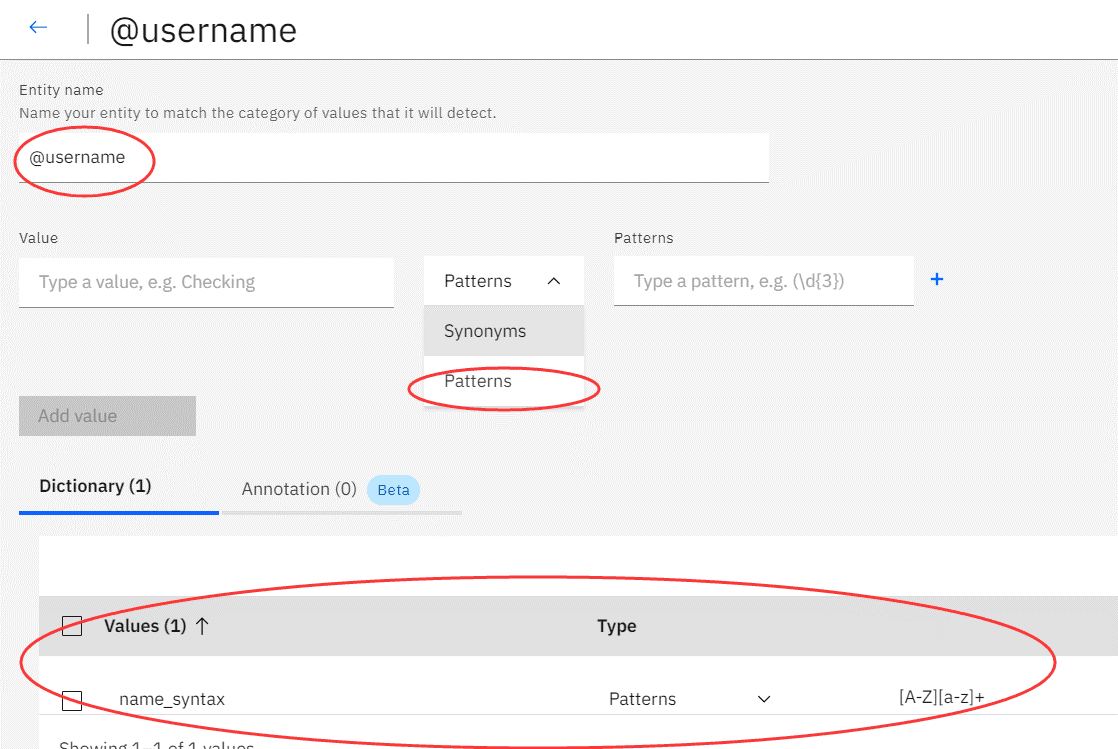
Step 3.7. Create @username on an entity, click on Entities > My entities > Create entities > Entity name is @username > value is name_syntax, type is Patterns, pattern is [A-Z][a-z]+ > Add value.
Step 3.8. Back to Entities > Select System entities > tick all boxes.
Step 3.9. Click Intents tab > Create intent > named #order > user example: hi, I’d like to order cakes.
Step 3.10. Click on Dialog > click on the icon of dessert folder > select “Name” node > create condition (If assistant recognizes): #intents > select “#order”.
Step 3.11. Click on node options on the Name node > Add child node, called “Dessert” > create condition: #name, add or, select @username, add or, select @sys-person > there are node options on the right of Assistant responds > Select “Open context editor” > Variable is username > Value is “<? @sys-number.literal ?>” > Assistant responds: What desserts would you like, $username?
.png)
.png)
Step 3.12. On the Dessert node > add the other response type > Text: Do you need a menu? Or I can provide some specials?
There are three options, 1. I need a menu; 2. The assistant offers recommendations; 3. I know what I’d like to get.
Step 3.13. Make a menu: Create a new intent, called “#menu” > user examples:
I need a menu.
Pudding(/pudding) menu
Cake(/cake) menu
Could you give me some recommendations?
Specials (/specials)
> Back to Dialog > Create a new child node on the Dessert node, called “menu” > condition is #menu > Assistant responds: Ok, here is our menu. > Add new response type > Text changes to Option > Title: Which dessert/ menu you like? > List labels are Pudding and Cake, Value is pudding menu and cake menu.
.png)
.png)
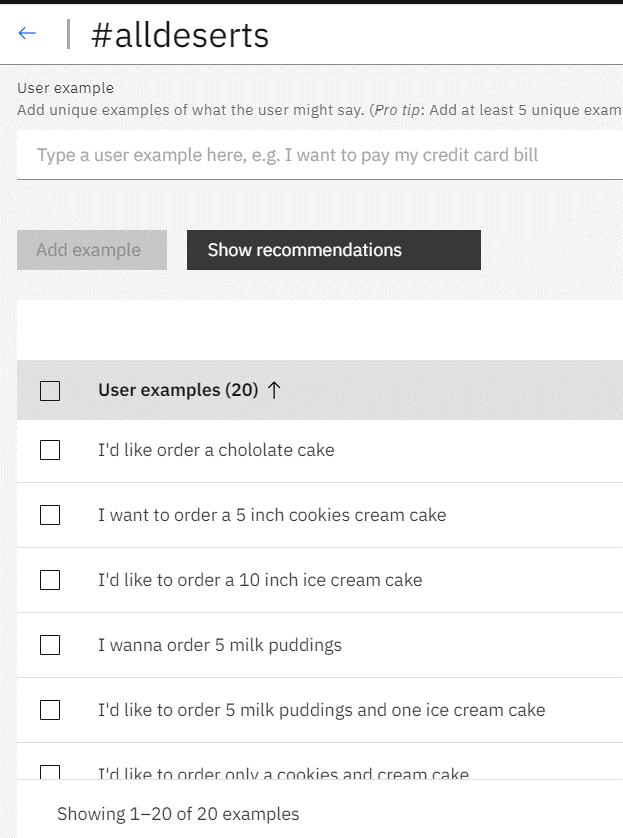
Step 3.14. Click Intents tab > Create Intent called “#alldesserts” > list more desserts as possible, including cakes and puddings.
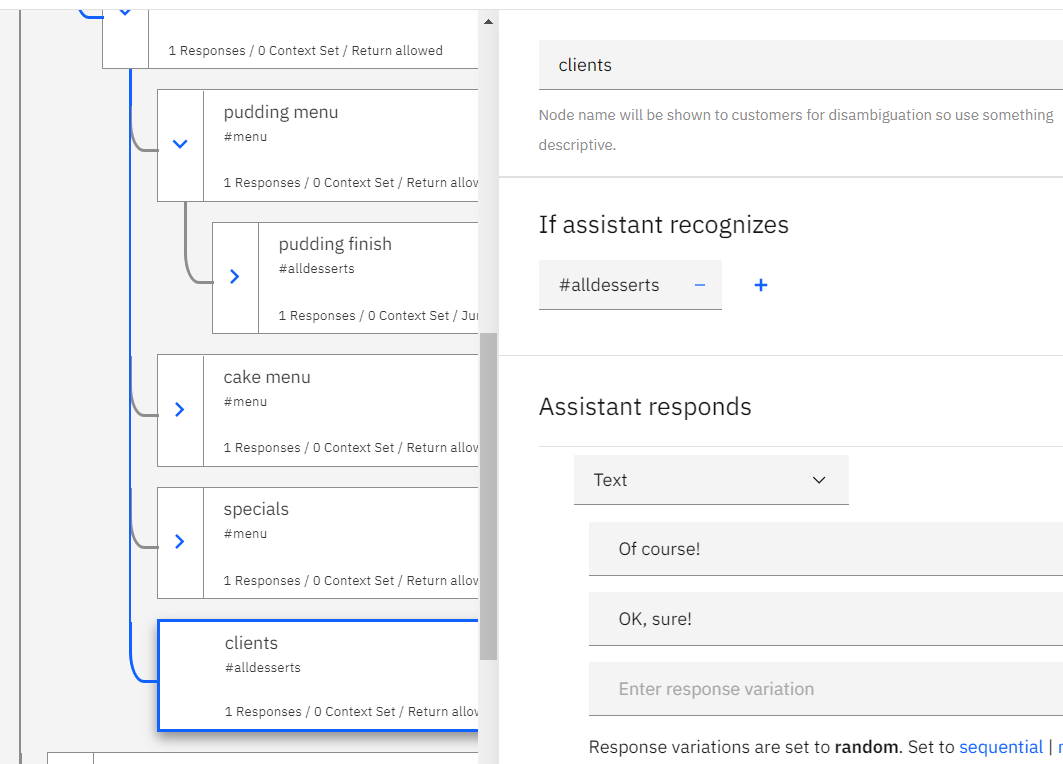
Step 3.15. Go back to the Dialog > create a new child node on the menu node, called “pudding menu” > condition: #menu> Assistant responds: We have chocolate puddings, vanilla puddings, and milk puddings > Add child node on the pudding menu, called “pudding finish” > condition is #alldesserts > Assistant responds: No problem! > Again, create a new child node on the menu node, called “cake menu” > you turn, it’s the same way to create conditions!
Note
It’s also possible that a client wants to know the cake menu after she/he chooses the pudding menu. Therefore, you need to think about how to create nodes and intents.
Step 3.16. It’s the same way to create the rest of two options (an assistant recommends a desserts (specials), and clients make choice).
Note
Don’t make wrong levels.
Step 3.17. Add node below on the Dessert node, called “phone number” > Assistant responds: What’s your phone number?
Note
Don’t add any conditions.
Step 3.18. Create a new intent called “#phonenumber” > examples: my phone number is @sys-number; number is @sys-number > click on Dialog > Add a child node on the phone number node, called “end” > conditions: #phonenumber, add or, select @sys-number > assistant responds: Thanks, we’ll send a message to you. Have a nice day!
Step 3.19. Select “pudding finish” node > Wait for reply (on the “The assistant should”) needs to change to Jump on > Select “phone number” node, and click on Respond.
.png)
.png)
Note: All the end of options node, such as pudding finish node, cake finish node, and specials finish node should be Jump to phone number.
Note
Now you can test your Chatbox. Click on “Try it”.
Part 4. Unity Settings
This tutorial introduces how to use IBM Watson SDK in Unity 3D in order to interact with a 3D character based on your Chatbox.
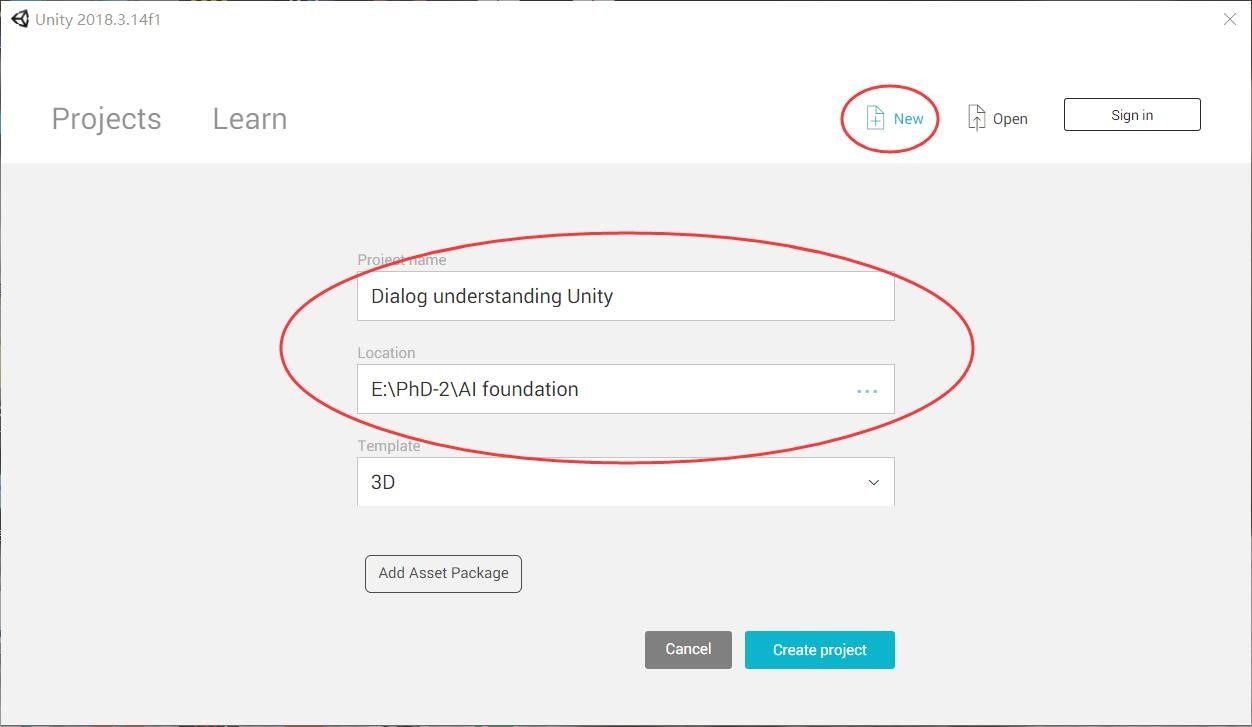
Step 4.1. Open Unity > Create a new project, called “Dialog understanding Unity” > Choose the file location.
Step 4.2. Click on File > Save as > Scenes, called “Dialog understanding”
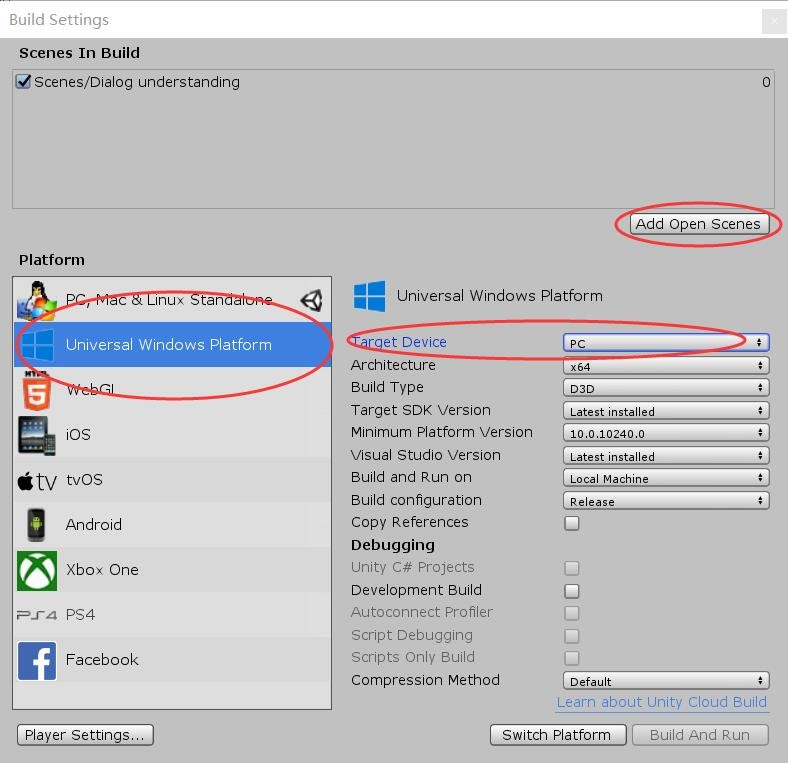
Step 4.3. File > Building Settings > Select “Universal Windows Platform”> Click Add Open scenes > Target Device >Select “PC” > Build
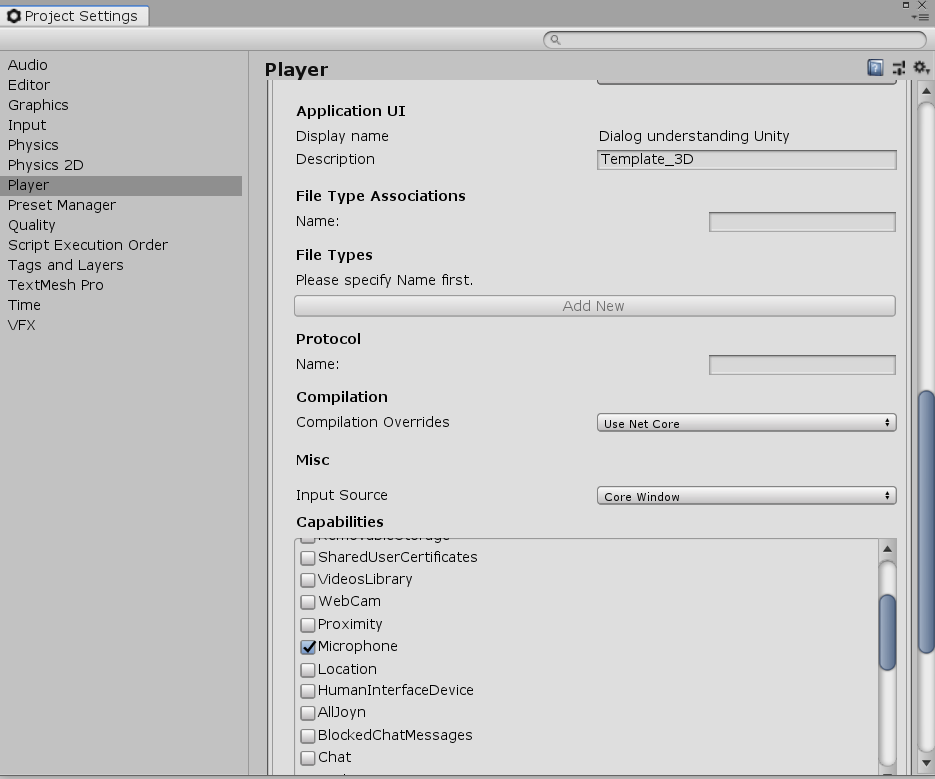
Step 4.4. Click Edit > Select Player > Capabilities > tick the box of Microphone.
Part 5. Using Watson in Unity3D
Step 5.1. Open the Unity file.
Note
If there are lots of warnings and errors on the Console, please click Clear button.
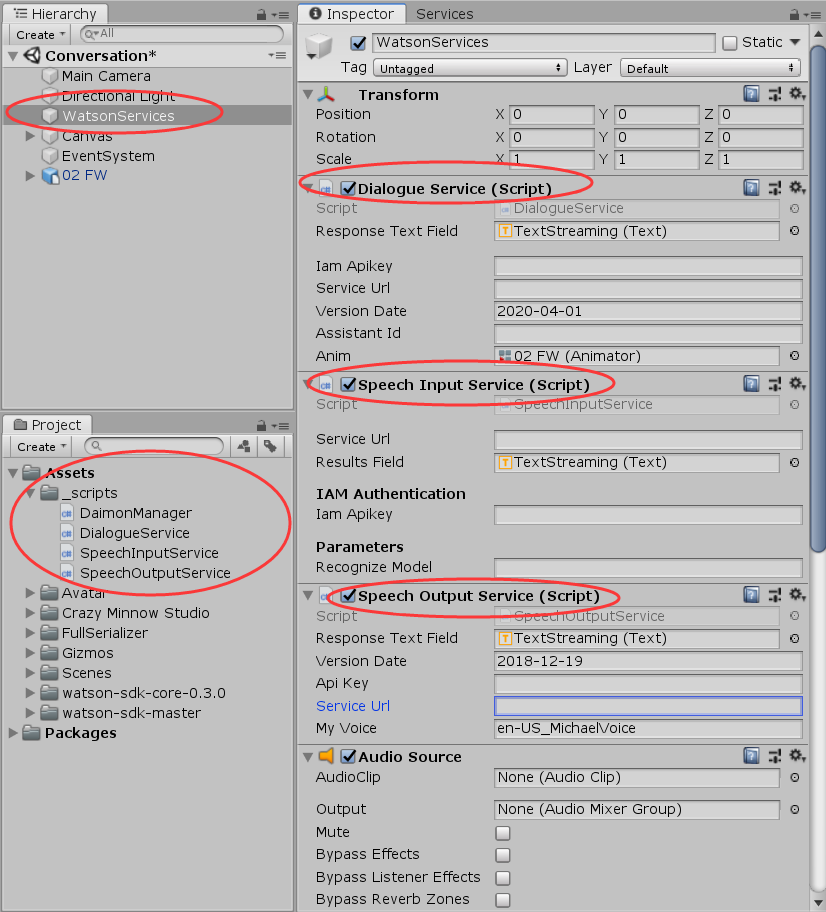
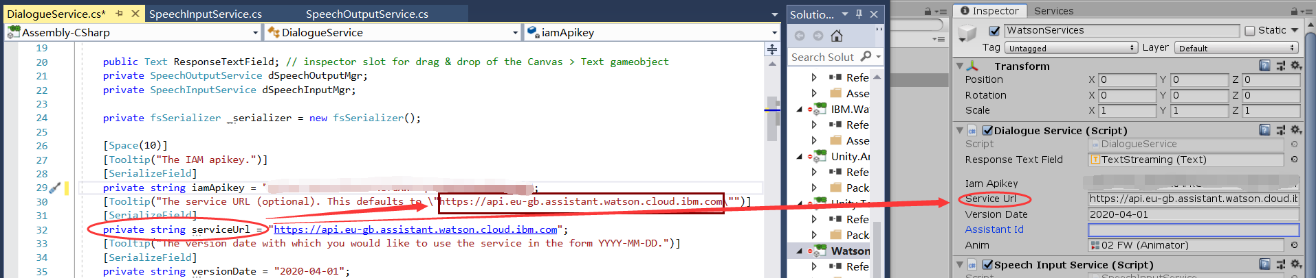
Step 5.2. Click on WatsonServices on Hierarchy window, and open the “_scripts” file on Project window. Dialogue Services is the script of DialogueService, and it also links to Watson assistant. Speech Input Service is the script of SpeechInputServices, it links to Speech to Text service, and Speechoutput links to Text to Speech service in IBM Watson, that is applied to create a spoken sound version of the text. Please double-click on the three services in Visual Studio.
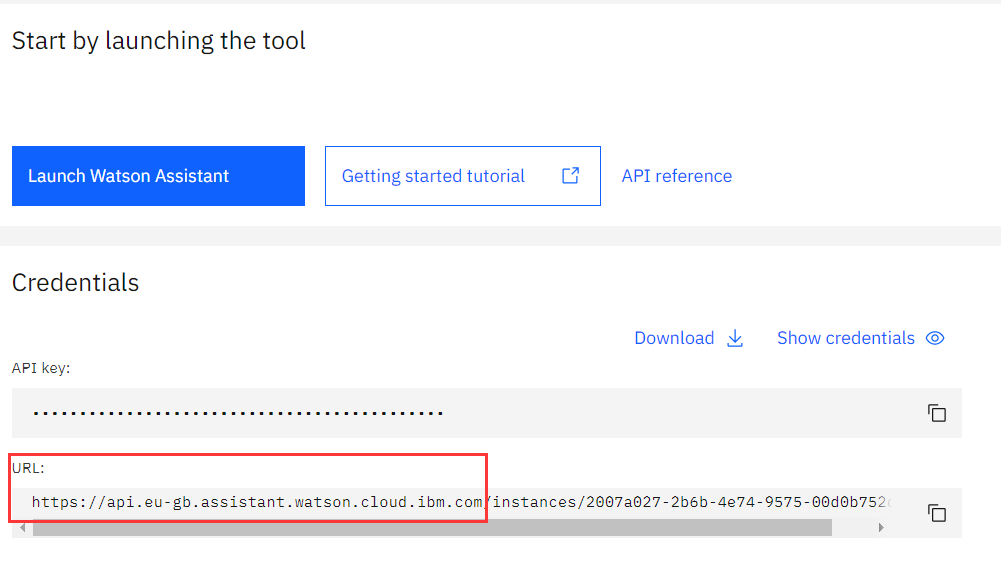
Step 5.3. Go to your IBM Cloud Dashboard> Services > Watson Assistant > Click on the copy icon to make note of the API key. The API key applies basic authentication, in here it’s the password. URL is location specific. So make sure your URL matches with your location.
Note
However, if your URL is very long, it cannot work in Unity. For example, in this picture the URL should be https://api.eu-gb.assistant.watson.cloud.ibm.com
Service endpoints by location:
· London: https://api.eu-gb.assistant.watson.cloud.ibm.com
· Frankfurt: https://api.eu-de.assistant.watson.cloud.ibm.com
· Washington, DC: https://api.us-east.assistant.watson.cloud.ibm.com
Step 5.4. Go back to Unity > Paste it on your API key to Iam Apikey in the Dialogue Service, and also paste it to the corresponding script.

Step 5.5. Again, copy the URL > paste it to Service Url, ServiceURL, and ServiceURL (optional) on the script.
Step 5.6. Launch Watson Assistant > Select the node options on your Watson Assistant > Settings > Click on API Details > copy Assistant ID to Unity and the script.
.png)
.png)
Step 5.7. It’s the same way to copy API key and URL, and past it to your Unity and the corresponding scripts for Speech to Text & Text to Speech.
Service of Speech to Text endpoints by location
· Washington, DC: https://api.us-east.speech-to-text.watson.cloud.ibm.com
· Frankfurt: https://api.eu-de.speech-to-text.watson.cloud.ibm.com
· London: https://api.eu-gb.speech-to-text.watson.cloud.ibm.com
Service of Text to Speech endpoints by location
· Washington, DC: https://api.us-east.text-to-speech.watson.cloud.ibm.com
· Frankfurt: https://api.eu-de.text-to-speech.watson.cloud.ibm.com
· London: https://api.eu-gb.text-to-speech.watson.cloud.ibm.com
Step 5.8. Before playing it, we need to configure your service credentials. Save unity file (Ctrl+S), close Unity > open the location of the Unity file > find ibm_credentials.env, and open it.
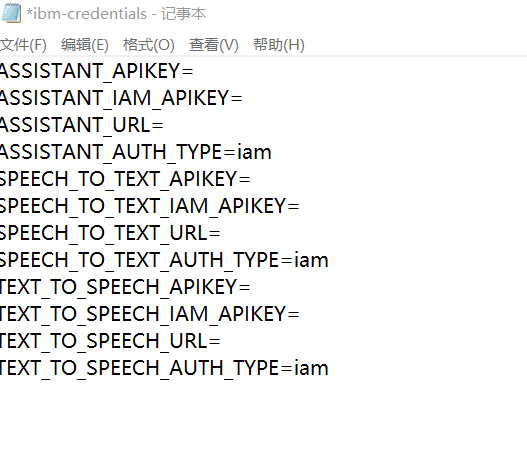
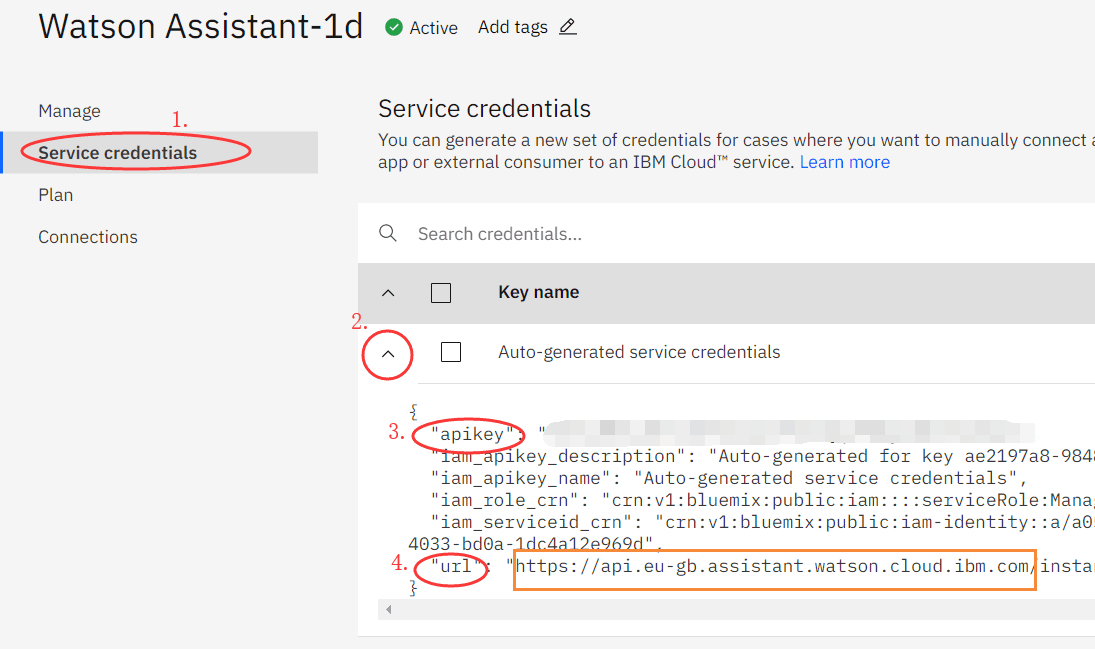
Step 5.9. Log in IBM Cloud account > select Watson Assistant > Click Service credentials > Click the arrow to view your credential > copy apikey, and past it to ASSISTANT_APIKEY and ASSISTANT_IAM_APIKEY > cope url, and past it to ASSISTANT_URL. Please complete others, and save it.
Step 5.10. Open Unity, and let’s play it.
Note
You may find it’s different from that you tried it in IBM Watson. For example, the assistant doesn’t automatically jump to the next sentence that we added response types (i.e. Do you need a menu?). The option we created in the menu node also doesn’t work in Unity. Therefore, you need to create more nodes for options.