 Continuous Integration & Unit Tests
Unit Tests in Unity
Unity provides a module called “Unity Test Framework”. Until Unity 2018, the test runner is shipped with the Unity editor. From Unity 2019 onwards, it is a separate package which can be imported using Unity’s package manager. The test runner is based on an early version of NUnit which is a unit testing framework for C#.
Test Runner Window
The test runner adds a new window which can be found under Window > General > Test Runner. It provides a list of available tests which are grouped by their namespace.
Play Mode Tests and Edit Mode Tests
Unity’s unit tests are divided into play mode tests and edit mode tests.
The difference between the two is that play mode tests are executed in the application’s runtime environment where the callback methods of MonoBehaviours are executed.
Editor tests are executed directly in the editor’s environment and no callback methods of MonoBehaviours are called.
Hence, test files for editor tests need to be placed in a folder called “Editor”.
The folder can be placed anywhere in the project, e.g. under Assets/Tests/Editor.
However, the two test types do not create a strict division between tests for the application logic and tests for editor tools.
If application logic should be tested which does not involve any callback methods, the test can also be created as an edit mode test.
The advantage of edit mode tests is that they take less time to execute because play mode tests have to launch the separate runtime environment.
Moreover, the tools and methods of the Unity editor are also available.
This means that it is possible to access any file in the Assets folder using usual file readers from System.IO.
In contrast to this, play mode tests exist in the runtime environment and can even be compiled into a separate application which launches and runs the tests.
Therefore, play mode tests can only access assets by the usual means known from Unity app development, e.g. by using Resources.Load() to find files which have been placed in a “Resources” folder.
Hence, a good practice is to use edit mode tests whenever possible, i.e. if no MonoBehaviour callback methods are required.
Assembly Definition Files
As a prerequisite for creating tests, an assembly definition file has to be created in the folder where the tests are placed. If a project has both play mode tests and edit mode tests, separate assembly definition files are required.
 Note
Note
The test runner window provides initialization options which can directly generate the folders and necessary assembly definition files. The following section is for information purposes so that you understand what these initialization options do and how to set them up manually. For the automatic setup of the test folders, take a look at the exercise at the end of this chapter.
Assembly definition files separate the project’s scripts into different libraries. If you do not use assembly definition files, all scripts are compiled into one big Assembly-CSharp.dll in the build process. This dll-file is referenced by the Unity engine so that the custom code can be executed in the final application. However, if an assembly definition files is created in a folder, all scripts in the folder and all sub-folders are compiled to its own dll-file. This is useful to manage dependencies between scripts. For instance, scripts which are managed under other assembly definition files, can only be accessed if they are added to the list of Assembly Definition References. Moreover, is can be defined for which platform the scripts should be included.
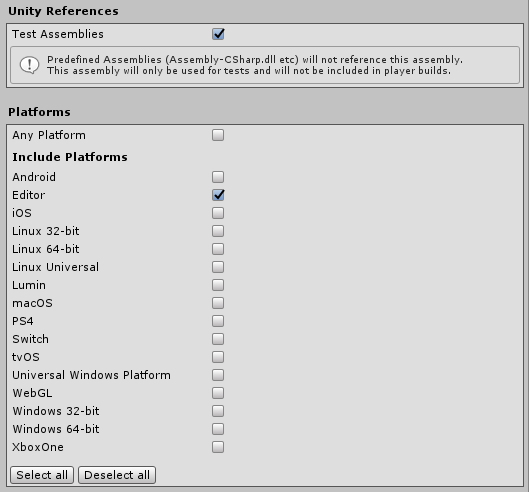
In the case of the editor scripts, the assembly definition files should be set up in a way that under Platforms only Editor is checked. In addition to this, all test assembly definition files must check Test Assemblies in the Unity References section. This way, the NUnit framework becomes accessible.
Creating a Test Class
Once you have created a test folder and the assembly definition file, testing classes can be added to the folder. To do this, right-click in the assets browser and select Create > Testing > C# Test Script. This creates a plain C# class in which unit tests are defined. The created file is based on a template that already imports NUnit and that contains some example tests.
Execution Duration of Tests
Both edit mode and play mode tests can be executed within one frame or can run for multiple frames. They are declared differently with regard to the attribute of the test method and the return value:
Tests That Run in One Frame
Tests of methods that run in one frame, e.g. straightforward calculations, are declared using the attribute [Test].
Moreover, they have to be void-methods.
Tests That Run Multiple Frames
By declaring a test method with the attribute [UnityTest] and with the return type IEnumerator, tests can run for multiple frames.
Essentially, the test method works like a co-routine.
The given code is executed in the same frame until the instruction yield return null is reached.
It will skip to the next frame.
Structure of Tests
Unit tests follow the structure “Arrange-Act-Assert”. In the arrange phase, the object that should be tested is created and its dependencies are set up. In this phase, pre-conditions are established, e.g. input parameters for the method to test and a well-defined application state is created. After that, the act phase executes the code that should be tested. Finally, in the assert phase, the results of the code execution are validated and compared to an expected values and states. For instance, the return value of the tested method is compared to the result that should have been returned. The checks also include inspecting side effects that a method can have.
Assert
In the assert phase, there is a toolset available in C#, NUnit and Unity which can be used to inspect and check the application state after the code execution.
Checking Values
To compare values to an expected constant, the Assert class can be used.
It is part of the NUnit framework.
The Assert class provides many different static methods that can be used to check values.
For instance, Assert.IsTrue(someCondition) checks if a boolean expresssion evaluates to true.
Similarly, Assert.IsFalse(someCondition) checks that a condition is false.
If the assert statement is correct, the code will resume.
However, if an assertion fails, e.g. Assert.AreEqual(2, 3), an exception is thrown, meaning that the rest of this particular test method is not executed.
This causes the test to fail.
Expecting Exceptions
Tests can also fail if the code that is tested throws an exception.
However, in some cases, a test should provoke such exceptions.
As an example, imagine that we are testing a calculator class.
There is a class Divide(int a, int b) that calculates the result of a divided by b.
The specification states that the class should throw an InvalidOperationException if the method divides by 0.
Hence, we write a unit test that calls Divide(1,0).
So, in this case, the exception is actually the intended behaviour.
However, if this test is written this way, it will fail because of the exception.
Instead, we can wrap code into Assert.Throws which means that we are expecting a specific type of exception.
Actually, the test now has to throw the exception and will fail otherwise.
The test now looks as follows:
Assert.Throws<InvalidOperationException>(
(TestDelegate)delegate
                {
                    Calculator.Divide(1,0);
                });
LogAssert
In Unity, scripts can write to the debug console using Debug.Log("").
If an error is logged during the test execution using Debug.LogError("") this also causes the test to fail.
Therefore, Unity provides a class LogAssert.
It can be used to declare that certain console outputs are expected using LogAssert.Expect(type, message).
This statement that a log is expected has to be placed before the actual Debug.Log statement.
The first parameter defines the type of log output, e.g. an info text, a warning or an error message.
The second parameter is the expected message.
Instead of specifying the exact message, it is also possible to provide a regular expression using System.Regex.
Software Architecture with Unit Tests in Mind
Writing unit tests can become difficult if the architecture consists of tightly coupled components where dependencies are not exposed. When creating the system architecture, there are different techniques that will simplify the creation of unit tests. For instance, follow the SOLID principles of code. If code is structured according to these rules, the result contains loosely coupled modules with well-defined dependencies. This way, individual features and functionality can be separated well into their own unit tests and dependencies can be replaced using a mocking framework.
One dependence which can create difficulties in testing are MonoBehaviours.
They have to run in a scene on a GameObject, so tests for MonoBehaviours will need to set up and tear down the corresponding scene architecture.
However, the structure of such scripts can be changed so that the unit tests do not require MonoBehaviours.
This is possible using the humble object pattern:
It separates a complex class that would be hard to test on its own into two classes.
One of them contains the dependencies that were difficult to test.
The second class consists of the core logic which should be tested.
By separating the dependencies, we are left with a class that only contains easy to test code which resembles the component’s behaviour.
In the application, the two classes work together to still provide the same functionality as the complex single class did.
However, in the unit tests, the second class that is easy to test can be checked to validate that the core logic is working correctly.
In the case of Unity, the humble object pattern would result in one class that is a MonoBehaviour and a plain C# class.
The MonoBehaviour creates an instance of the C# class by calling its constructor in the Start method.
Once it receives the typical MonoBehaviour callbacks, e.g. for Update(), the MonoBehaviour calls the corresponding methods of the C# class instance.
The C# class implements the actual functionality.
This way, in unit tests, one can create an object instance of the C# class by calling its constructor and perform the tests on it.
There is no need to create a GameObject, attach a MonoBehaviour or to manage the scene.
Mocking Frameworks
In a software architecture with loosely coupled modules, dependencies and interfaces to other classes are well-defined. These dependencies can interfere with the unit test since the result of a function can depend on the status of such dependency objects. If there is an error in the dependency, the test for the function relies on the dependency fails which makes it harder to locate the error. For this reason, unit tests should only test the code of the inspected function and all dependencies should be mocked. A mock object is an object which behaves in the same way as the original object but it does not actually perform complex computations in the background. Mocking dependencies does not only guard against errors in the implementation of the dependency class but it also allows simulating different states of external resources, such as the Web or IO operations. As an example, there is a class with a function that categorizes the popularity of a Web page by checking its daily visitor count. To do this, the function receives the URI of the target Web page as an input argument and sends a Web request to the analytics server to query for the statistics of this URI. As an answer, it gets the number of visitors for the given day. Based on some given thresholds, the visit number is classified into a number of categories which can then be used by an application’s UI to visualize the popularity of the Web page in a colour scheme. In this example, the Web request is a dependency of the function that determines the popularity. The result of the function does not only depend on its input argument (the URI) but also any external state (the result of the Web request). The unit test which checks this function should not perform Web requests and it cannot control the values which will be returned. Hence, the Web request should be mocked so that it returns a simulated answer. The mock Web request object does not actually send a query to the Web but always returns a pre-defined answer that can be set up by the developer. This way, it is possible to systematically check how the function behaves based on different answers. For instance, in one unit test, the mock Web request could simulate a disconnected state where the query cannot be answered by the server. Other unit test cases include simulated answers with where the developer passes different visitor counts to check if the function correctly categorizes them.
For C#, there are different mocking frameworks available such as NSubstitute, moq or FakeItEasy.
Continuous Integration
Continuous integration allows projects to run checks and builds in an automated manner. Such a CI routine is executed when new changes are committed to the repository. This makes sure that possible errors in the program code can be spotted immediately when they are caused. Moreover, it assumes that quality standards are met, e.g. when reviewing merge requests or for releases. This can be done by defining a range of tasks that e.g. run unit tests, compile the code, generate documentation, calculate code quality metrics and deploy results to devices. CI is applied to a source-controlled repository, e.g. on GitHub or Gitlab since this ensures that all developers work on the same code basis.
GitHub Actions
GitHub Actions is an automation feature for GitHub repositories. It gives developers the option to define workflows by combining a series actions. Such actions can be self-created or shared actions by the community can be re-used. The ability to import existing actions speeds up the creation of the workflows since they are preconfigured and only require some input parameters to run. As an example, there is a series of actions available for Unity-specific tasks.
A repository can have multiple workflows. Their execution can be triggered by certain events, e.g. at a regular time, by pushing to a specific branch or by posting a pull request. Each workflow consists of jobs which are executed in parallel but can also wait for each other if necessary. A job executes a series of steps. These steps are the actions which can be self-defined or imported from the community marketplace.
Open-source repositories on GitHub can use this feature for free whereas users of private repositories can sign in for a usage plan. Each of the plans ranging from free to enterprise include an initial amount of minutes that the tasks are allowed to run on GitHub’s servers. For each minute that exceeds the limit, additional fees have to be paid. Tasks can run on GitHub’s Linux, Windows or macOS runners. Each of them have different fees and they contribute at weights to the initial limit (GitHub Actions Pricing). Unity actions can run on Linux machines which are the cheapest option.
Tutorial: CI with GitHub Actions for Unity Repositories
This tutorial will demonstrate how to set up the GitHub Actions for Unity repositories. After finishing this tutorial, the GitHub repository will automatically perform checks of the unit tests and build the project. It will do this by setting up a Docker container with a Unity installation, pulling the changes and building them in the Docker container.
 The tutorial is structured as follows:
First, we will create the necessary workflow files one by one. This involves a licence activation step, unit testing and the final build. Before we can build the Unity application on the server, we need to create activation credentials for Unity. Each installation of Unity requires its own licence that has to be activated before using Unity. When installing Unity on your PC, this is a small step where you have to log in with your Unity ID but for a Docker container this process is more involved. Licences are bound to one PC, so it does not work to transfer existing licences between machines. The solution is to set up a workflow that causes the Unity instance in the Docker container to generate a licence request. This licence request can be returned as an artefact that we can download. After that, we will manually activate the licence which can be done on any PC. Finally, we will receive the valid licence which can then be added to the list of secret environment variables in the GitHub repository.
After the activation, we create the workflow for the unit tests and after that, we will tackle the automatic build of the application’s install files.
Creating a Workflow File
As a prerequisite, you require an GitHub account and a repository on GitHub with a Unity project. Either choose an existing project or create a new empty project and upload it to GitHub.
- In the root folder of your repository, create a folder “.github”. The folder name must start with the dot. GitHub looks for this folder, e.g. to find the workflow configuration or actions.
- In the “.github”-folder, create a folder “workflows”. Inside this folder, we will define the workflows for the project. A project can contain multiple workflows.
- First, we need to set up the aforementioned activation workflow. Create an empty yaml file, e.g. with the name “activation.yml”. Open the file in a text editor or IDE to define the workflow.
-
Detailed information about the available options can be found in GitHub’s documentation. Workflows are defined in the YAML format. It is a data serialization format that is indentation sensitive. You should pay attention to the indentation of each line and use a consistent amount of spaces. To create the activation workflow, copy the following piece of YAML:
name: Acquire activation file
on: [push]
jobs:
  activation:
    name: Request manual activation file
    runs-on: ubuntu-latest
    steps:
    # Request manual activation file
    - name: Request manual activation file
      id: getManualLicenceFile
      uses: webbertakken/unity-request-manual-activation-file@v1.1
      with:
        unityVersion: 2018.4.15f1
    # Upload artifact (Unity_v20XX.X.XXXX.alf)
    - name: Expose as artifact
      uses: actions/upload-artifact@v1
      with:
        name: ${{ steps.getManualLicenceFile.outputs.filePath }}
        path: ${{ steps.getManualLicenceFile.outputs.filePath }}
Gitlab CI
Gitlab provides a runner